


Chat
Chat with us
Lorem Ipsum is simply dummy text of the printing and typesetting industry.
Launch ChatStores
Visit us
Our customer service representatives at all Cablenet Stores are more than happy to assist you.
Find NowContact form
Send your message
Lorem Ipsum is simply dummy text of the printing and typesetting industry.
Go to formCallback
Send your phone
Lorem Ipsum is simply dummy text of the printing and typesetting industry.
Contact Information
Get in touch
Call the Customer Call Center on 130 or +357 22255130 (from abroad) for:
Customer Support
08:00 - 22:00 (Monday - Friday)
09:00 - 18:00 (Saturday)
Technical Support
08:00 - 22:00 (Monday - Friday)
09:00 - 21:00 (Saturday - Sunday)
What are the Internet connection speed options which are offered?
The Internet connection speed options are the following:
- Purple Internet 200: 200Mbps download / 30Mbps upload
- Purple Internet 300: 300Mbps download / 30Mbps upload
- Purple Max Internet 1G: 1Gbps download / 50Mbps upload
Can I upgrade my Internet connection speed?
Yes, you can upgrade your Internet plan online or visit a Cablenet store.
How are Cablenet services installed?
Cablenet services are installed following delivery of service from the Cablenet network to the roof of your apartment building or house. Services will be connected and equipment installed at your home’s first TV installation outlet.
How are Cablenet services delivered to the subscriber premises?
All of Cablenet’s services (broadband service, TV and fixed telephony) are transmitted to the subscriber’s premises via coaxial or fibre-optic cable placed by Cablenet’s technical staff during installation. In the case of coaxial installation, the cable terminates at a special termination box (it’s called an isolator and splits the signal for the modem and TV services), or directly at the fibre-optic converter (usually the fibre-optic service modem) in the case of optical fibre cable installation.
Which are the RF frequencies that I can use for internal distribution within a home so as not to interfere with Cablenet’s signals?
To distribute RF frequencies within a home’s interior, kindly use only the frequencies below as all other frequencies are either used or may be used in the future for Cablenet’s own transmissions. Channel 34 – Frequency 578 MHz Channel 35 – Frequency 586 MHz Channel 36 – Frequency 594 MHz
What are the DVB T broadcast frequencies on Cablenet’s network?
The best way to tune the DVB-T channels transmitted on Cablenet’s network is to use the automatic Digital Aerial (or similar) scanning feature of your TV set or receiver, if this is an available option. If you want to manually tune the DVB-T channels, the frequency information is as follows: Channel 31 – Frequency 554 MHz – Velister Transport Stream 2 Channel 32 – Frequency 562 MHz – Velister Transport Stream 1 Channel 33 – Frequency 570 MHz – CYBC Transport Stream
How to install Plume HomePass® by myself?
- Download the Plume app from either the Apple Store or Google Play. Next, launch the Plume app.
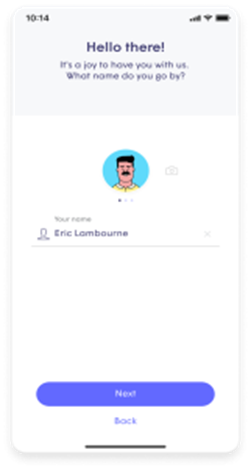
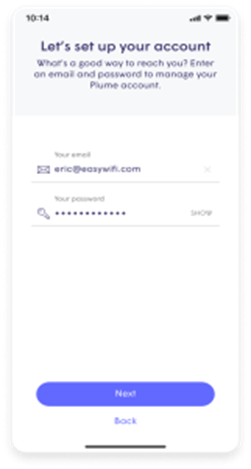
- Choose “Set up Plume”, then enter your name and email to create your Plume account.
- Passwords must be at least eight characters.
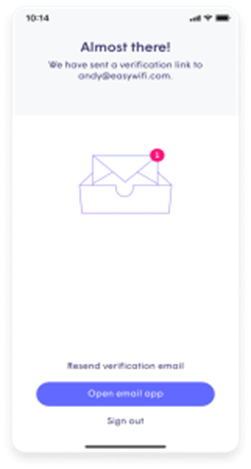
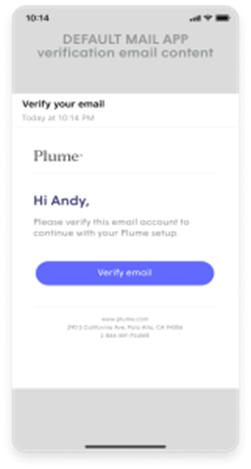
- Check your email and verify the email account that will be associated with your new Plume account.
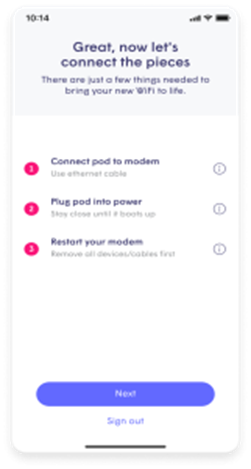
- Next, there are a few steps to setup your Pod. There is an option for Advanced setup, if needed.
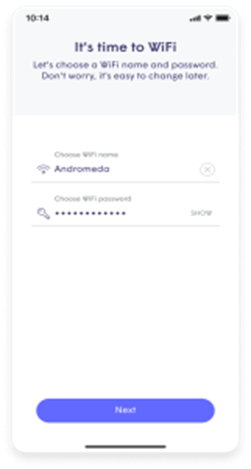
- Enter your WiFi name and password. There will be a series of helpful on-screen tips for additional pod placement.
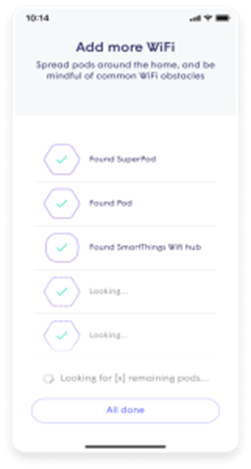
- If you have more than one pod, plug it in and add it to your network now.
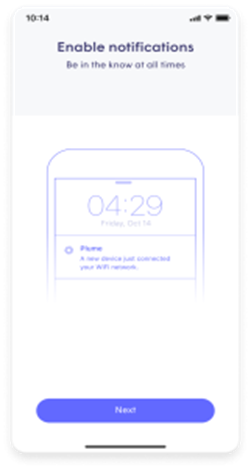
- Be sure to enable notifications. This will help you be aware of your home network activity.
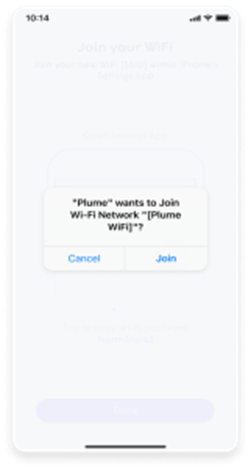
- The Plume app will prompt you to join the new WiFi network.
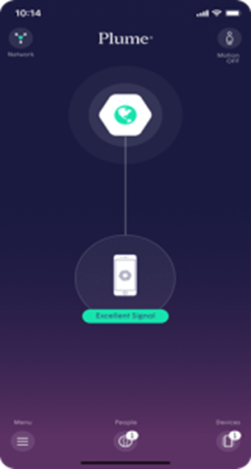
- Finally, after you’ve allowed Plume to join your network, you’ll be taken to the home screen. Over the next 24 hours, your new Plume WiFi network will optimize to create the best performance for your connected devices.
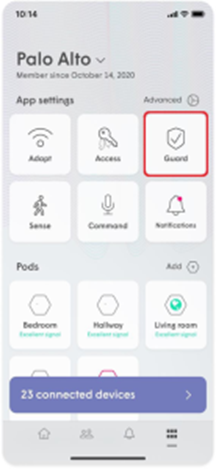
How can I change the WiFi network code?
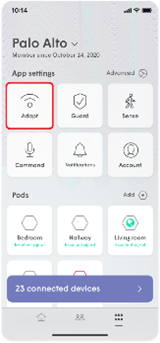
If you have the Plume Homepass® service, follow these 3 simple steps: 1. Go to the Settings option and then the Adapt option.
How long does it take to arrange for installation of internet services?
15 working days is the maximum length of time, provided that conditions allow it.
I want to cancel my subscription, and my contract hasn’t expired yet. What do I need to pay?
New subscribers: early termination fees for a 24month contract
|
Termination Month |
Administration Charge | Installation Charge | Services Used Charge |
TERMINATION FEE |
|
0 – Activation Month |
€25.00 | €60.00 | €0 | €85.00 |
|
1 |
€25.00 | €57.50 | €0 |
€82.50 |
| 2 | €25.00 | €55.00 | €0 |
€80.00 |
|
3 |
€25.00 | €52.50 | €0 | €77.50 |
|
4 |
€25.00 | €50.00 | €0 | €75.00 |
| 5 | €25.00 | €47.50 | €0 |
€72.50 |
| 6 | €25.00 | €45.00 | €0 |
€70.00 |
|
7 |
€25.00 | €42.50 | €0 | €67.50 |
|
8 |
€25.00 |
€40.00 | €0 |
€65.00 |
| 9 | €25.00 | €37.50 | €0 |
€62.50 |
|
10 |
€25.00 |
€35.00 | €0 | €60.00 |
|
11 |
€25.00 | €32.50 | €0 | €57.50 |
| 12 | €25.00 | €30.00 | €0 |
€ 55.00 |
| 13 | €25.00 | €27.50 | €0 |
€52.50 |
|
14 |
€25.00 |
€25.00 | €0 | €50.00 |
| 15 | €25.00 | €22.50 | €0 |
€47.50 |
|
16 |
€25.00 | €20.00 | €0 | €45.00 |
| 17 | €25.00 | €17.50 | €0 |
€42.50 |
|
18 |
€25.00 | €15.00 | €0 | €40.00 |
|
19 |
€25.00 | €12.50 | €0 |
€37.50 |
| 20 | €25.00 | €10.00 | €0 |
€35.00 |
|
21 |
€25.00 | €7.50 | €0 |
€32.50 |
|
22 |
€25.00 | €5.00 | €0 |
€30.00 |
| 23 | €25.00 | €2.50 | €0 |
€27.50 |
| 24 | €25.00 | €0 | €0 |
€25.00 |
| Termination Month | Administration Charge | Installation Charge | Services Used Charge |
TERMINATION FEE |
|
0 – Activation Month |
€25.00 | €0 | €0 |
€25.00 |
|
1 |
€25.00 | €0 | €0 |
€25.00 |
|
2 |
€25.00 | €0 | €0 |
€25.00 |
|
3 |
€25.00 |
€0 | €0 |
€25.00 |
|
4 |
€25.00 | €0 | €0 | €25.00 |
| 5 | €25.00 | €0 | €0 |
€25.00 |
|
6 |
€25.00 | €0 | €0 |
€25.00 |
|
7 |
€25.00 | €0 | €0 |
€25.00 |
|
8 |
€25.00 | €0 | €0 |
€25.00 |
|
9 |
€25.00 | €0 | €0 |
€25.00 |
|
10 |
€25.00 |
€0 | €0 |
€25.00 |
|
11 |
€25.00 | €0 | €0 |
€25.00 |
|
12 |
€25.00 | €0 | €0 |
€25.00 |
|
13 |
€25.00 | €0 | €0 |
€25.00 |
|
14 |
€25.00 | €0 | €0 |
€25.00 |
|
15 |
€25.00 | €0 | €0 |
€25.00 |
|
16 |
€25.00 |
€0 | €0 | €25.00 |
|
17 |
€25.00 | €0 | €0 | €25.00 |
|
18 |
€25.00 |
€0 | €0 | €25.00 |
|
19 |
€25.00 | €0 | €0 |
€25.00 |
| 20 | €25.00 | €0 | €0 |
€25.00 |
| 21 | €25.00 | €0 | €0 |
€25.00 |
| 22 | €25.00 | €0 | €0 |
€25.00 |
|
23 |
€25.00 | €0 | €0 | €25.00 |
| 24 | €25.00 | €0 | €0 |
€25.00 |
Fixed Telephony
Can I keep my existing telephone number?
You can keep your existing telephone number by following the number portability procedure. You will need a copy of your last telephone bill and to present your ID card.
Is there any charge for the transfer of my existing telephone number to Cablenet’s network?
There is no charge for transferring your existing telephone number to Cablenet’s network.
Can you provide me with a telephone number in case I do not already have one?
Cablenet offers new telephone numbers.
Can I have a telephone line in more than one rooms of the household?
You can have a telephone line in more than one room if the necessary ramification exists. Cablenet’s telephone line is provided through the modem. The cabling distribution to other points in your premises is your responsibility.
How much do I save if I choose Cablenet’s telephony service compared to other providers?
Take advantage of the free calls between Cablenet’s fixed telephony subscribers. Also, Cablenet provides lower rates on fixed telephony for local and international calls.
Are there any other extras which come with the telephony service?
Cablenet offers Caller ID, call forwarding, number withhold service, per-line blocking (number with prefix 900 and 909) and international calls blocking, free of charge. As an additional service for a monthly subscription of €3,55 you can have the following services: do not disturb, call waiting, caller ID during call waiting, teleconferencing, distance call forwarding (to another telephone device), wake up call, rejection of anonymous calls.
Calling Line Identification Presentation (CLIP)
The telephone number (landline or mobile) that is calling you will appear on your mobile’s screen unless the caller has activated the Calling Line Identification Presentation (CLIP) service.
Calling Line Identification Restriction (CLIR)
To withhold your number, dial #31# before each call. The Number Withholding service is free.
Call Forwarding Unconditional
To activate Call Forwarding, dial *21*number to which you want your calls forwarded#. To deactivate, dial ##21#. The Call Forwarding service is free. Call Forwarding when the line is busy, when you are unable to answer and when a call can not be completed can be activated simultaneously. Calls forwarded are charged according to the current pricelist.
Call Forwarding when line is busy
To activate Call Forwarding when your line is busy, dial *67* and the number to which you want your calls forwarded#. To deactivate, dial ##67#. The Call Forwarding service is free. Call Forwarding when the line is busy, when you are unable to answer and when a call can not be completed can be activated simultaneously. Calls forwarded are charged according to the current pricelist.
Call Forwarding when you cannot answer a call
To activate Call Forwarding when you are unable to answer your calls, dial *61* and the number to which you want your calls forwarded#. To deactivate, dial ##61#. The Call Forwarding service is free. Call Forwarding when the line is busy, when you are unable to answer and when a call can not be completed can be activated simultaneously. Calls forwarded are charged according to the current pricelist.
Call Forwarding when a call cannot be completed
To activate Call Forwarding when a call cannot be completed, dial *62* and the number to which you want your calls forwarded#. To deactivate, dial ##62#. The Call Forwarding service is free. Call Forwarding when the line is busy, when you are unable to answer and when a call can not be completed can be activated simultaneously. Calls forwarded are charged according to the current pricelist.
Barring of Outgoing Calls
To activate Blocking of Outgoing Calls, dial: *33*Barring PIN# (for Calls and SMS) *33*Barring PIN*11# (for Calls only) *33*Barring PIN*16# (for SMS only). To deactivate, dial #33*Barring PIN#. The Call Barring service is free. Default Barring PIN is 0000. To change Barring PIN use **03*330*old pin*new pin*new pin#
Barring of Outgoing International Calls
To activate Blocking of Outgoing International Calls, dial: *331*Barring PIN# (for Calls and SMS) *331*Barring PIN*11# (for Calls only) *331*Barring PIN*16# (for SMS only). To deactivate, dial #331*Barring PIN#. The Call Barring service is free. Default Barring PIN is 0000. To change Barring PIN use **03*330*old pin*new pin*new pin#
Barring of Outgoing International Calls, except calls towards Cyprus, whilst overseas
To activate Blocking of Outgoing International Calls, except calls towards Cyprus, whilst you are overseas, dial: *332*Barring PIN# (for Calls and SMS) *332*Barring PIN*11# (for Calls only) *332*Barring PIN*16# (for SMS only). To deactivate, dial #332*Barring PIN# The Call Barring service is free. Default Barring PIN is 0000. To change Barring PIN use **03*330*old pin*new pin*new pin#
Barring of Incoming Calls
To activate Blocking of Incoming Calls, dial: *35*Barring PIN# (for Calls and SMS) *35*Barring PIN*11# (for Calls only) *35*Barring PIN*16# (for SMS only). To deactivate, dial #35*Barring PIN#. The Call Barring service is free. Default Barring PIN is 0000. To change Barring PIN use **03*330*old pin*new pin*new pin#
Barring of Incoming International Calls whilst Overseas
To activate Blocking of Incoming International Calls whilst you are overseas, dial: *351*Barring PIN# (for Calls and SMS) *351*Barring PIN*11# (for Calls only) *351*Barring PIN*16# (for SMS only). To deactivate, dial #351*Barring PIN#. The Call Barring service is free. Default Barring PIN is 0000. To change Barring PIN use **03*330*old pin*new pin*new pin#
Call Waiting
To activate Call Waiting, dial *43#. To deactivate, dial #43#. The Call Waiting service is free.
Plume HomePass
How does Plume HomePass® work?
Plume is powered by the cloud, which means it can adapt to real life in real-time, ensuring that every room and every device has a reliable and fast connection now and into the future. Plume HomePass® is continuously learning about the user’s internet needs. It performs advanced self-optimizations and allocates capacity to the devices that need it most. And it gets better each day!
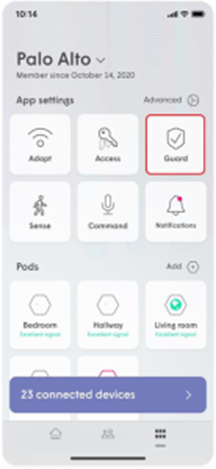
What is the HomePass® App?
When you get onboarded with the Plume HomePass® service, you will also download the HomePass® on your mobile device. The App lets you see which devices are accessing the Internet and how much they’re uploading or downloading. You can block and unblock specific devices from accessing the Internet and delivers daily reports on your home WiFi signal strength and network activity. With this App you take control of your WiFi network.
How to install Plume HomePass® by myself?
- Download the Plume app from either the Apple Store or Google Play. Next, launch the Plume app.
- Choose “Set up Plume”, then enter your name and email to create your Plume account.
- Passwords must be at least eight characters.
- Check your email and verify the email account that will be associated with your new Plume account.
- Next, there are a few steps to setup your Pod. There is an option for Advanced setup, if needed.
- Enter your WiFi name and password. There will be a series of helpful on-screen tips for additional pod placement.
- If you have more than one pod, plug it in and add it to your network now.
- Be sure to enable notifications. This will help you be aware of your home network activity.
- The Plume app will prompt you to join the new WiFi network.
- Finally, after you’ve allowed Plume to join your network, you’ll be taken to the home screen. Over the next 24 hours, your new Plume WiFi network will optimize to create the best performance for your connected devices.
How can I delete my Plume HomePass® data history?
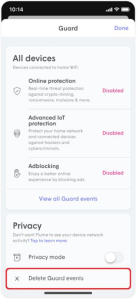
All Plume members have the right to be forgotten. HomePass supports two different types of data deletions. Delete security event data If you’d like to just remove items from your list of blocked events from either Guard or Content Access:
- In the HomePass app, open the More menu.
- Select the Guard option.
- On the bottom of the Guard settings page, you will find the Delete security events button.
- Simply tap the button and confirm that you would like to clear the data.
 Note that once deleted, this data cannot be recovered
If you haven’t disabled Guard or Content Access features, more events will continue to populate the list. Just continue to repeat this process as often as you need.
Note that once deleted, this data cannot be recovered
If you haven’t disabled Guard or Content Access features, more events will continue to populate the list. Just continue to repeat this process as often as you need.
What is the Plume HomePass® Control™?
The Control™ is an unparalleled parental controls and guest access solution. Give full home WiFi access to people you implicitly trust, create custom passwords for your guests, make the internet a safer place for your family and even schedule an Internet freeze for those who need some time off.
Why am I receiving Plume HomePass® Sense motion notifications when no one is home?
The most common reasons for receiving false Sense Alerts when no one is in your home are:
- The Motion sensitivity may be set too high or pet mode is not enabled. If you have pets try enabling pet mode, or try turning down the Motion sensitivity to medium or low.
- If you have more than one location, alerts are sent for all locations under your Plume account. Switch your app to the other location and check the Motion Today graph to see if the events displayed in that location correspond to the alert you have received.
How can I add Plume HomePass® Pods to an existing Plume account?
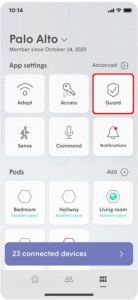
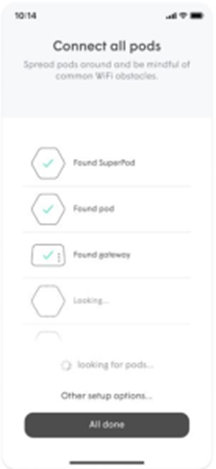
We strongly recommend that you use a Pod as your gateway in order to distribute the best performance across your entire home! Adding a new pod
- Plug in your Pod anywhere within your home and stay nearby.
- On the Home page, scroll down to the Adapt section.
- Tap the ⋮ to open the Options Menu.
- Tap on Add a pod.
- Wait until your new pod(s) is found and select Done Adding Pods when all additional pods have been claimed.

- Unplug the current gateway pod.
- If you have a modem, unplug it from the power outlet.
- Connect the new SuperPod to your modem by Ethernet cable. If it a SuperPod with WiFi 6, make sure you are using the left Ethernet port.
- Plug your new SuperPod into the power outlet. Once the SuperPod’s LED starts to slowly pulse, plug your modem back into power and wait until the LED turns off.
- You should be able to view your SuperPod and other pods in your app when the network is back online.
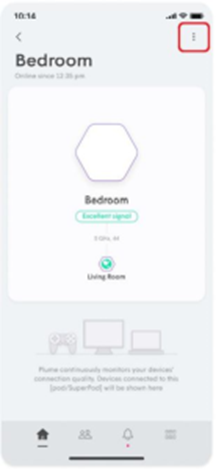
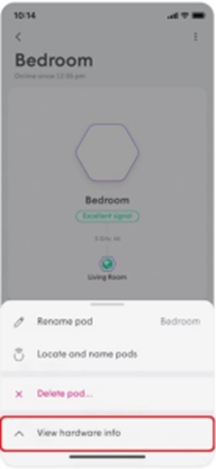
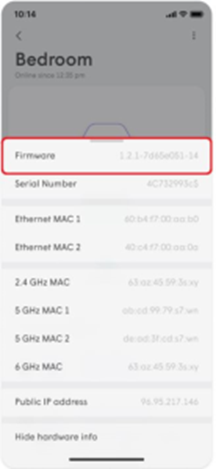
How can I check the firmware version on my Plume HomePass® pods?
- From the Home screen, scroll down to pod list in the Adapt section.
- Tap on any pod you wish to see device information about.
- Tap the ⋮ icon in the upper right-hand corner.
- Tap View Hardware Info. Firmware version will be the first item in the list. Please visit this link for full release notes. In addition to the firmware version, you can also view the pod’s serial number, MAC address and assigned IP address.
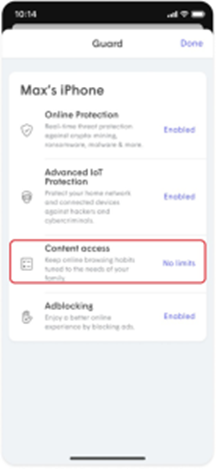
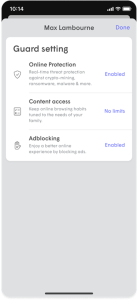
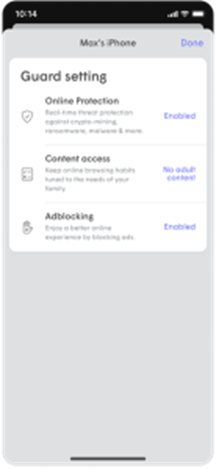
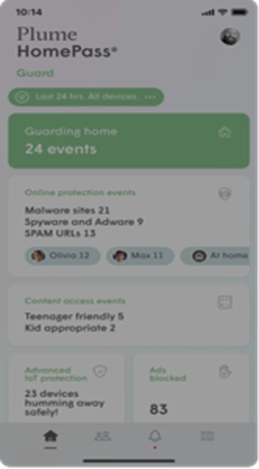
How does Plume’s content access work?
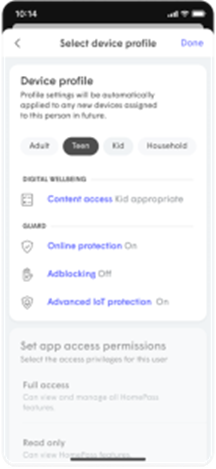
Plume’s content access feature will allow you to restrict content for a device or person. We have identified the most common content filtering categories that you can use when personalizing your online experience. When setting up content filtering for a person or device, you can enable any of the four content filtering categories:
- No limits: You can access all types of content.
- Kids appropriate: Content that is tagged as NOT appropriate for kids will be filtered and inaccessible.
- Teenager friendly: Content that is tagged as NOT appropriate for teens will be filtered and inaccessible.
- No adult content: All content tagged as adult content will not be accessible.
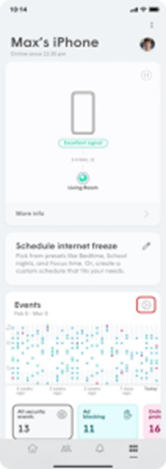
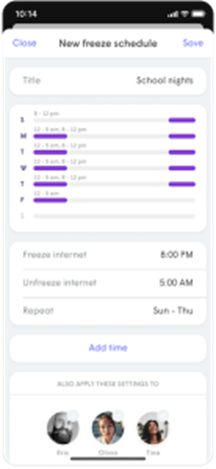
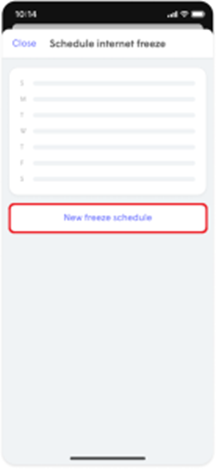
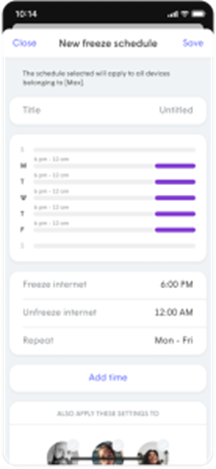
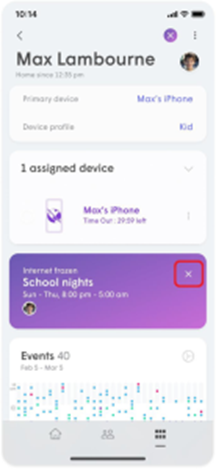
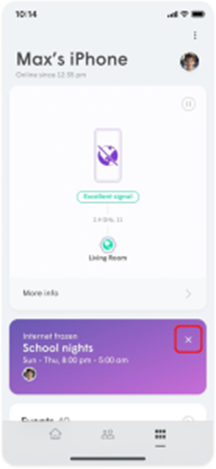
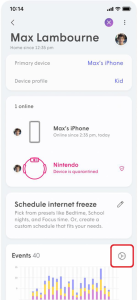
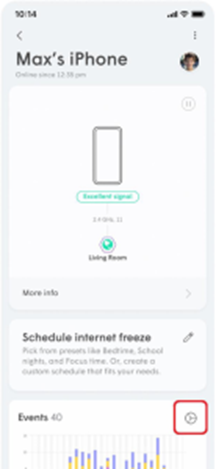
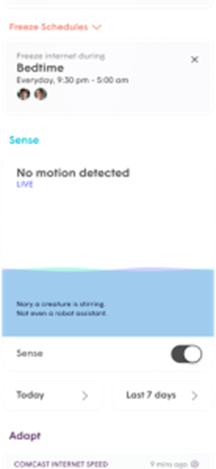
How do I schedule an Internet Freeze for a device or person with my Plume HomePass® service?
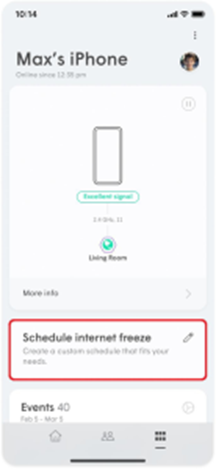
Internet Freeze allows you to easily manage how much time is spent on the internet by a device or person by using a Freeze schedule or as needed. Schedule or Turn on Internet Freeze for a device.
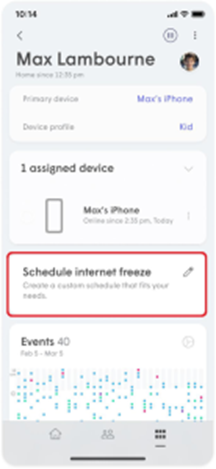
- Select the device in the app to access the device details page.
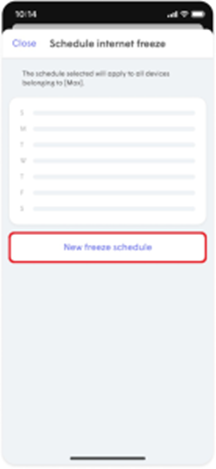
- Tap on Schedule Internet Freeze.
- Type in a name for this Freeze schedule.
- Tap on a day and enter the Freeze internet (start) time and Unfreeze internet (end) times.
- Choose the Repeat option if this schedule will be the same on multiple days or tap on another day to set different Freeze and Unfreeze times for that day.
- Choose a person if this Freeze schedule will be used for all of their devices.
- Tap on Save once your schedule is complete.
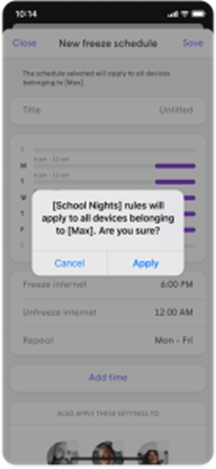
- Select the person from the People page.
- Tap on Schedule Internet Freeze.
- Type in a name for this Freeze schedule.
- Tap on a day and enter the Freeze internet (start) time and Unfreeze internet (end) times. Choose the Repeat option if this schedule will be the same on multiple days or tap on another day to set different Freeze and Unfreeze times for that day.
- Tap on Save once your schedule is complete and Apply to confirm.

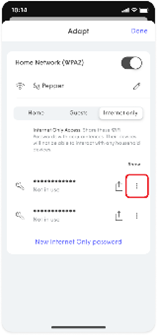
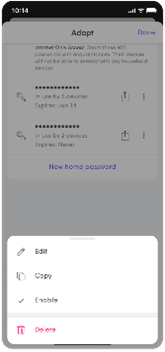
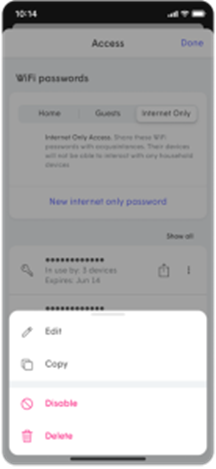
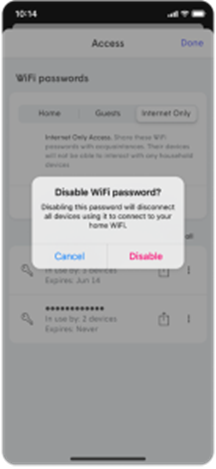
How do I disable or change a WiFi password to my Plume HomePass®?
How do I disable or change a WiFi password? You can easily edit, delete, or temporarily disable a password by using the HomePass app. You can also edit the access level of any user with guest access. To suspend or control access on a device level, use the Device Freeze feature. Editing WiFi passwords
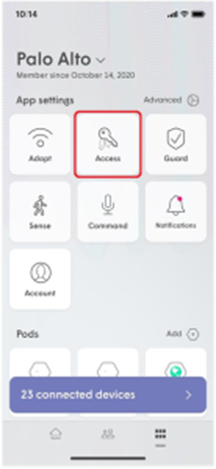
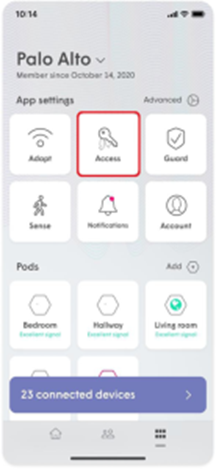
- From the More menu, tap on the Access option.
- Tap on Home, Guests, or Internet Only to access that zone’s page.
- Tap the ⋯ next to the password you want to modify.
- Choose Edit, Disable, or Delete.


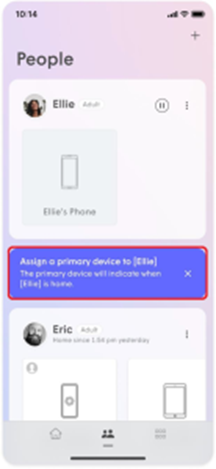
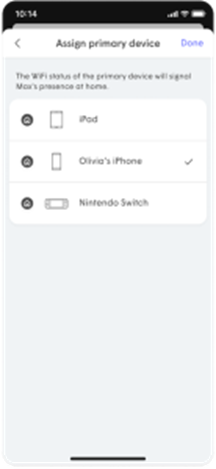
How do I assign a Primary Device to someone?
Each person can have a primary device assigned to their profile. That primary device’s connections and disconnections from the network determines if they show up as being at home, which is also important for managing Sense alerts.
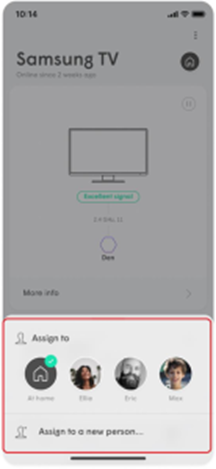
- Tap on the people icon and choose a person. Ensure the device in question is already assigned to that person.
- If a primary device has not been set, the Assign primary device notification will be shown. Tap on the notification.
- Choose a primary device and tap on Done to save.
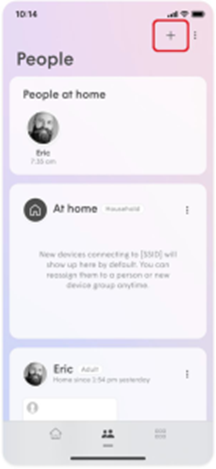
How do I add or remove a person to my Plume HomePass® service?
Adding people allows you to conveniently monitor and manage their WiFi access. Adding a Person
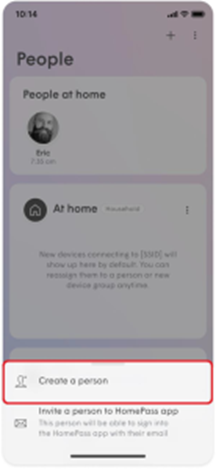
- From the People screen, tap on + button.
- Choose the Create a person option.
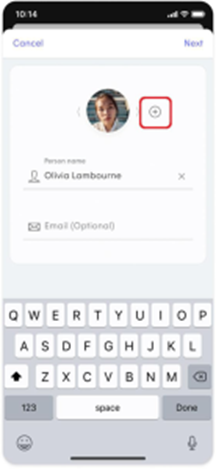
- Add a photo using the + , enter the Person name and Email (optional) and tap on Next.
- Set their Device profile information. This allows you to control Content access as well as their Guard settings for all their assigned devices while they are connected to the network.
- Tap on Done and the person will be added to the list of people.
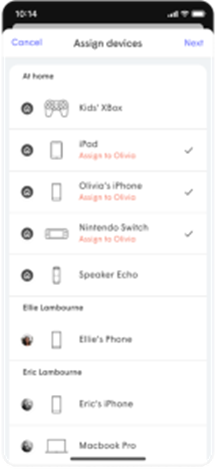
- Use the Tap to assign device option under their card. The devices you select will apply the rules set in the previous step to those devices and allow you to monitor and manage the person’s Internet usage.
- Once all device have been selected and you tap on Done, you will be prompted to assign a Primary device, which is used to determine if they are home. Be sure to choose a device that they will always take with them.
- Tap on Done once a primary device is chosen.
- Please note that creating a person using the steps above does not give them the ability to manage the network. Click here if you want to Invite a person to help you manage the network.


How do I transfer a device from one person to another with my Plume HomePass® service?
If you accidentally assign a device to the wrong person, you can simply reassign it to another person’s profile (or create a new profile).
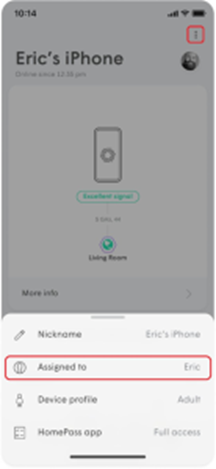
- Navigate to the incorrectly assigned device.
- Tap on the ⋮ on the upper right-hand corner to view the device menu and select Assign Device to…
- Select the appropriate profile to move the device to. You can also add a new person profile to your app at the same time!
- Your device will now appear under the new profile!
- Please note that any rules (Adblocking, Content Access, or Online Protection) will be reset to match the new profile.
Can I set different parental controls on a person, device or location level with my Plume HomePass® service?
Adblocking, Online Protection, and any custom Approve / Block lists can only be configured on a location, person, or device level. Content Access (parental control) settings can be configured on a person and device level. Location level: Applies to all devices connected to the network.
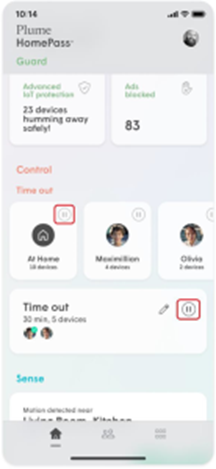
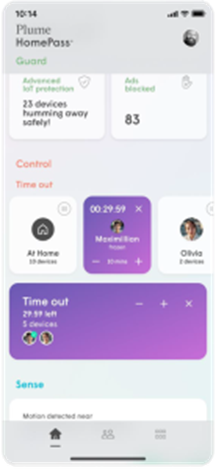
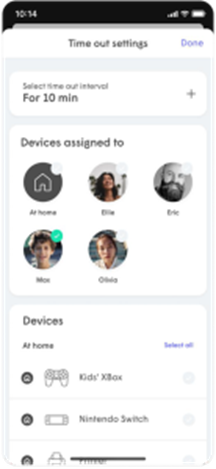
How to set a global or custom Internet Time Out with my Plume HomePass® service?
Plume gives you the ability to briefly freeze or pause internet access globally for all people or for all devices instantly through the Time Out feature. If you want to set a scheduled Internet break, consider our Device Freeze feature. Setting a custom Time Out / Global Time Out (All people)
- From the home screen, scroll to the Control Section and find the option Time Out menu.
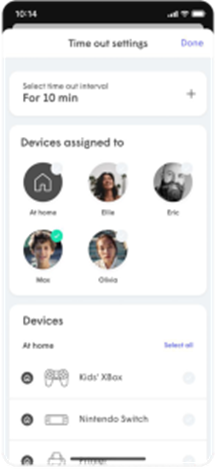
- Tap on the pencil icon to edit who will be put in a Time Out and the length of the Time Out.
- Use the + or – to modify the Time Out period in 10-minute increments.
- Under Devices belonging to, tap on the people individually or you can use the black checkmark to select everyone.
- Tap on Done to return to the previous screen.
- Tap on the pause icon to activate the Time Out. All devices assigned to the people selected will now have Internet access blocked. The Time Out timer will count down until expiry.
- Use the +, – or x to modify the duration or cancel the Time Out.
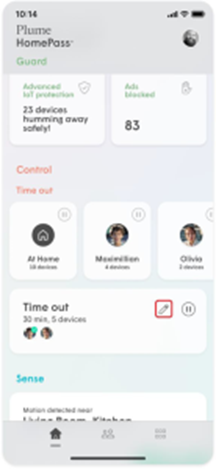
 Setting a custom Time Out / Global Time Out (All devices)
-
- From the home screen scroll to Control Section and find the Time Out menu.
- Tap on the pencil icon to edit who will be put in a Time Out and the length of the Time Out.
- Use the + to increase the Time Out period in 10-minute increments. Use the – to reduce the duration.
- Under Devices at home, tap on the devices individually or you can use the black checkmark to select all devices.
- Tap on Done to return to the previous screen.
- Tap on the pause icon to activate the Time Out. All devices selected will now have Internet access blocked. The Time Out timer will count down until expiry.
- Use the +, – or x to modify the duration or cancel the Time Out.
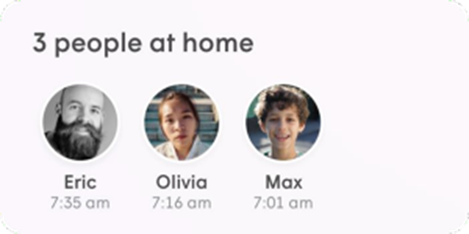
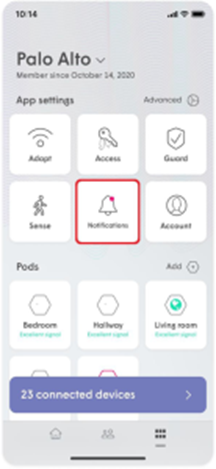
How can I tell if someone is home with my Plume HomePass® service?
If you have assigned a primary device for everyone in your home, you can use the People Notifications feature to receive notifications when people return home or leave. Enable People Notifications • Open the More menu and tap on Notifications. • Make sure People notifications are turned on and select the profiles for which you would like to receive alerts.

- Open the People Profiles view of the HomePass App
- If you have set up People Profiles and assigned them primary devices, the history of when they’ve been home will appear at the top.
- You can use the arrows to cycle the daily event history from Today all the way to 6 days ago.
How to create a new Home WiFi Password with my Plume HomePass® service?
During the initial setup, the first password created is a Home zone password, although you can add more. Local network access to devices connected to your network in the Home zone can be selectively shared with devices connecting with a Guest zone password.
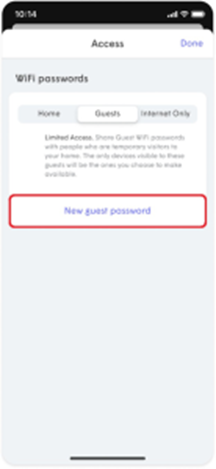
How to create a new Guest password with my Plume HomePass® service?
- Open the More tab and click on the Access button.
- While in the Guest settings page, tap on New Guest Password.
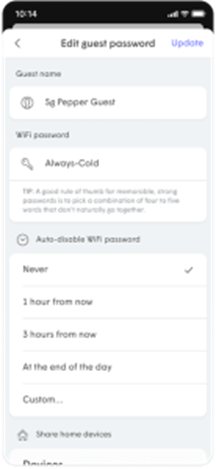
- Enter a name* and a new password.
- Use the drop-down arrow next to Auto-disable WiFi Password and choose one of the options.
- Add a checkmark next to one or more Shared Home Devices (printer, NAS, media player), to allow your guest access to it over the local network.
- Tap on the Add to save.

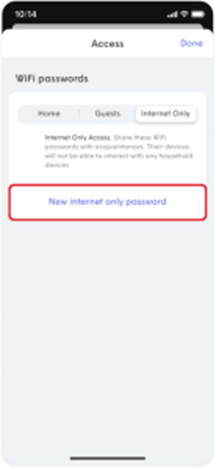
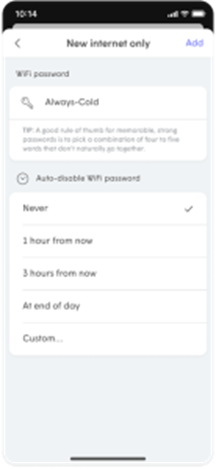
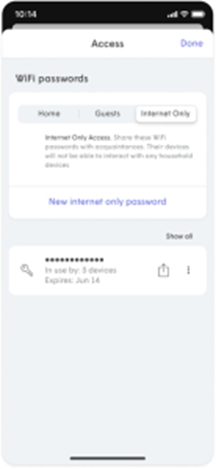
How to create a new Internet Only password with my Plume HomePass® service?
- Open the More tab and click on the Access button.
- While in the Internet Only settings page, tap on New internet only password.
- Enter a new password.
- Use the drop-down arrow next to Auto-disable WiFi Password and choose one of the options.
- Tap on the Add to save.

How do I share network passwords with my Plume HomePass® service?
- Tap on the menu icon on the App home screen.
- Tap the Access option to view the Network Name and Passwords.
- Tap on Home, Guests or Internet Only to access that zone’s settings page.
- Next to the password, you want to share, tap on the Share icon.
- Choose the method you want to use to share the password (SMS, email, Airdrop) and send it.
- The recipient will receive a link. Clicking on it will take them to a web page from which they can copy the Network name and the password.

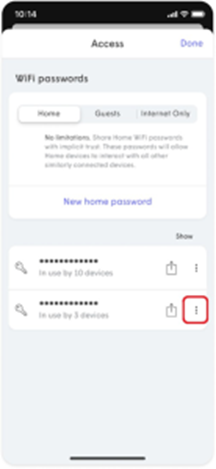
How do I disable or change a WiFi password with my Plume HomePass® service?
How do I disable or change a WiFi password? You can easily edit, delete, or temporarily disable a password by using the HomePass app. You can also edit the access level of any user with guest access. To suspend or control access on a device level, use the Device Freeze feature. Editing WiFi passwords
- From the More menu, tap on the Access option.
- Tap on Home, Guests, or Internet Only to access that zone’s page.
- Tap the ⋯ next to the password you want to modify.
- Choose Edit, Disable, or Delete.


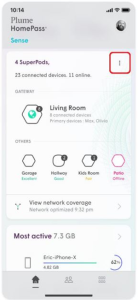
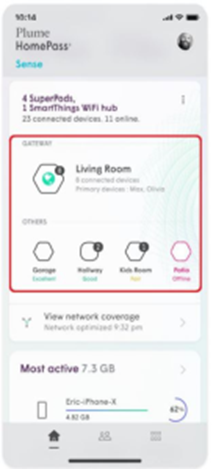
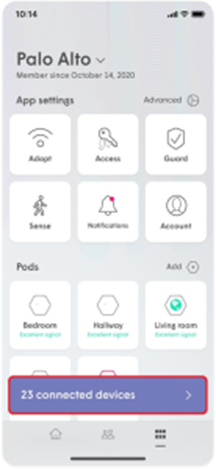
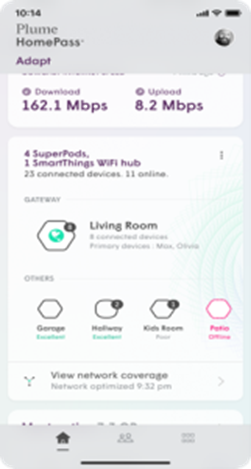
Where can I view my Plume network status?
You can always view the status of your pods from the Home Screen by selecting Adapt. You will be able to scroll through all the pods associated with your network with its current status.
Notification “Lost Internet Connection“ on my Plume HomePass® service. How do I get past this?
If the “Still looking for Internet connection to Plume pod…” screen pops up, it means that the HomePass App is not detecting an Internet signal on your gateway pod.
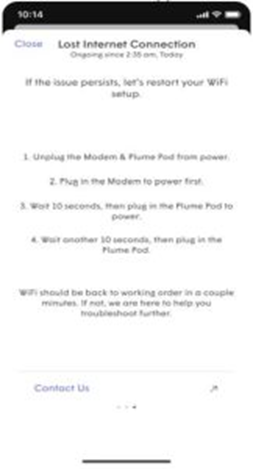
- No Internet is provided through your modem or router.• Power cycle your modem. If you have recently rebooted your modem or router, re-establishing the Internet connection can take a while. • If your gateway pod is connected to another router or switch, verify that it’s properly setup by reviewing our recommended setup here. To confirm Internet availability, try to connect the pod directly to the modem.
- Pod is not receiving any power.• Try to plug in the pod to another outlet. The LED should turn on.
- Pod does not power ON and is defective.• Try another pod so you can continue with the setup. Contact Cablenet Support to help diagnose your issue and facilitate the replacement of your defective pod.
- Bluetooth on your device is OFF.• Be sure to turn ON Bluetooth on your device. The Bluetooth option is often found in the Settings section of your device.
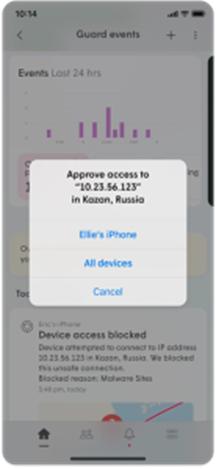
Does Plume HomePass® service Online Protection secure my network against IP based threats?
Online Protection now supports Outbound IP Protection and Intrusion Prevention, the latest advancement of Plume Guard features! Previously, Online Protection worked by detecting only malicious DNS based threats. By now protecting devices from connecting to malicious sites using IP addresses (Outbound IP Protection) and DNS based lookups, your home is now more protected than ever! Additionally, Intrusion Prevention automatically blocks connections from high-risk IP addresses trying to remotely connect to your devices, keeping you and your family safe from online threats. Another benefit of the IP based protection is that it enhances our Content Access feature by making it possible to manually block specific IP addresses in addition to domains. Outbound IP Protection and Intrusion Prevention are included when turning on Online Protection if you have a SuperPod connected as the Gateway Pod with firmware 2.4.3 and higher.
How do I approve (unblock) a website with my Plume HomePass® service?
You can approve a website for a person, the entire network or a device if not assigned to a person. Up to 50 websites can be approved in total. If you notice a website has been incorrectly blocked, please report it to support. Approving Websites for Everyone
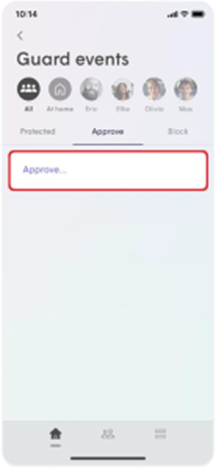
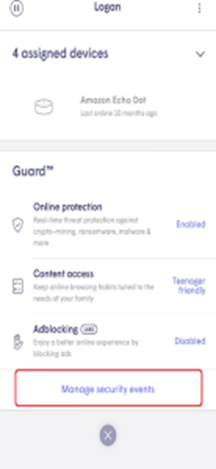
- From the Home page, tap on the Guard events.
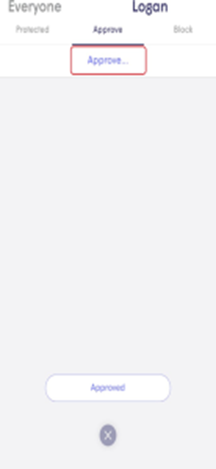
- Go to Approve tab and tap on Approve.
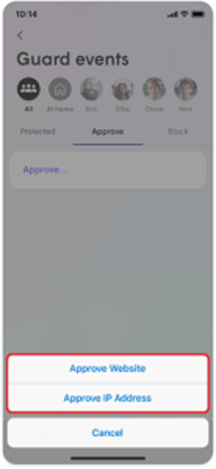
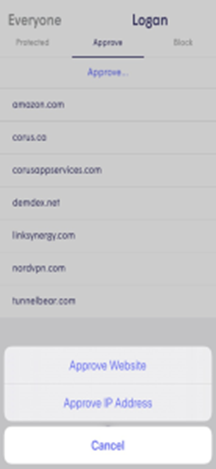
- Choosing Approve Website allows you to enter the URL of domain, while Approve IP Address allows you to enter the server IP address.
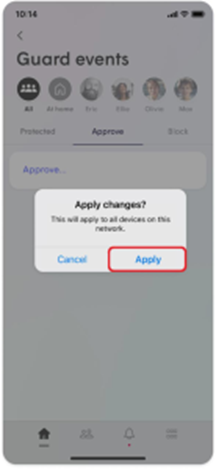
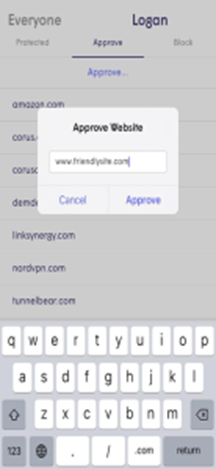
- Enter the URL or IP address and tap on Approve to save. Please note that the full domain name is required. For example; make sure to write “youtube.com” instead of “youtube”.
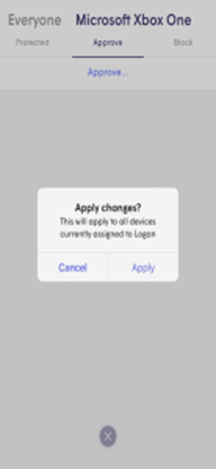
- Tap on Apply to confirm the changes.
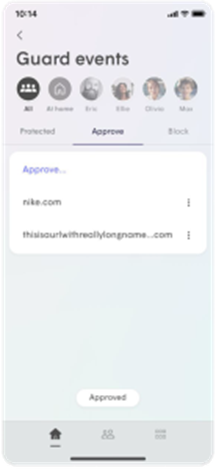
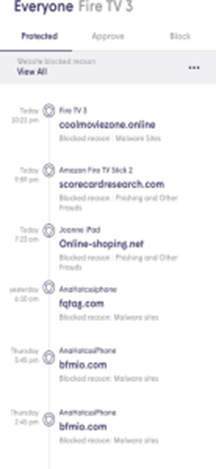
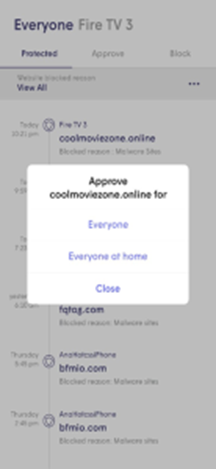
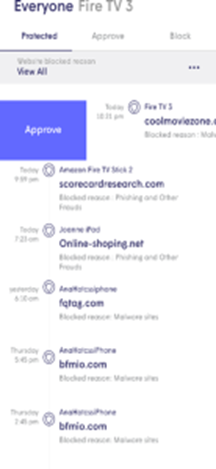
- Additionally, you are able to view previously blocked sites under the Protected tab. Tap or swipe on the blocked event to start the approval flow.

- Navigate to the desired person or device
- Tap on Manage security events at the bottom of the page
- Tap on Approve
- Choosing Approve Website allows you to enter the URL of domain, while Approve IP Address allows you to enter the server IP address.
- Based on your previous choice, enter the URL or IP address and tap the checkmark to save. The full domain name is required for websites. For example; make sure to write “youtube.com” instead of “youtube”. Tap on Approve to confirm your choice.
- If you are approving the site for a device that has been assigned to a person, the rule will also apply to the person. Likewise, approving a site for the person automatically applies that rule to all of their assigned devices. If the device is not assigned, the rule will only apply to the device.
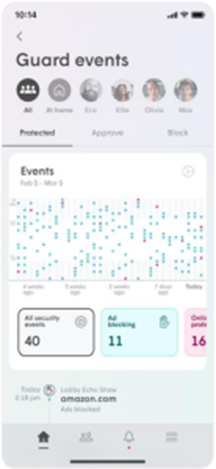
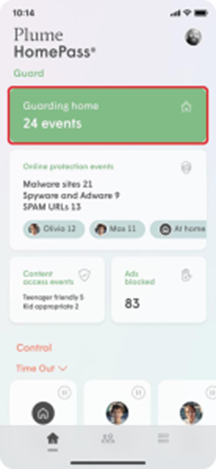
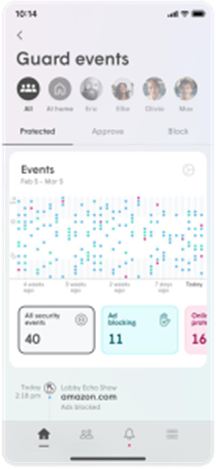
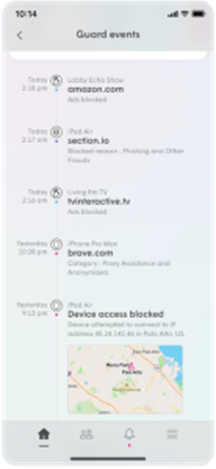
How can I tell what events have been blocked by the Plume HomePass® service Online Protection?
- From the Home screen and tap on the Guard events button.
- The Protected tab will display all blocked events.
- You can sort the list of events shown below by type of event or by choosing a person.
- Simply tap on any event to add the site to the Approved list if you trust that it is actually safe.

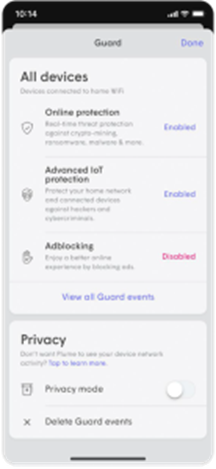
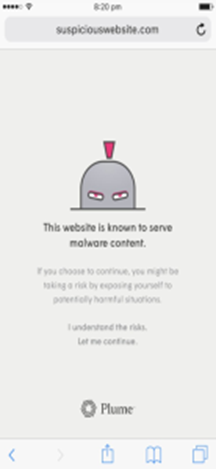
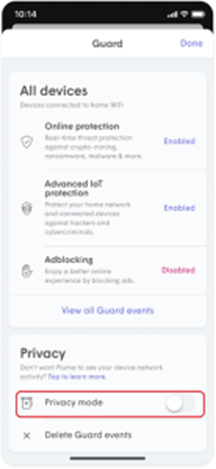
How does Plume HomePass® service Online Protection work?
Enabling the Online Protection feature will protect your devices from malware sites, botnets, spyware, spam, phishing, keyloggers, monitoring, proxy avoidance, anonymizer and other harmful attacks on your network. How do I turn on Online Protection? The feature is enabled on all devices by default, but can be customized on the device or person level for an individualized experience. When this is enabled for a person, the Online Protection will automatically be turned on across all the devices assigned to that person. Online Protection is controlled at the Network level in the Guard menu, while device and person settings can be modified from within their respective detail screens.
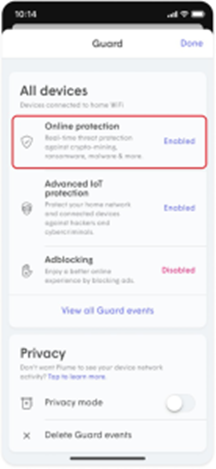
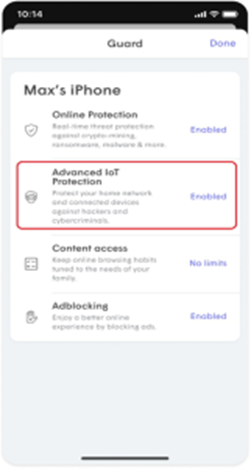
How is the Plume HomePass® service Advanced IoT Protection different from Online Protection?
Advanced IoT Protection (AIP) is a security advancement found in Plume Guard. Prior to its release, Online Protection protected all your connected home devices from going to sites known to host malware, spam, or phishing attacks. AIP provides protection from new, unknown attacks that are currently not part of any known threat intelligence database. It can detect unusual patterns in your IoT device’s activity that indicates the device may be infected. Advanced IoT Protection can be enabled via the Guard tab from within the main menu.

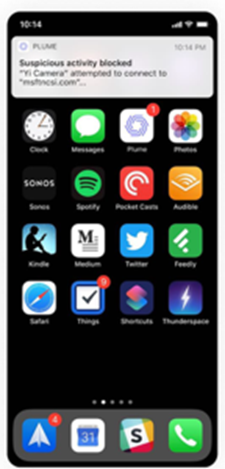
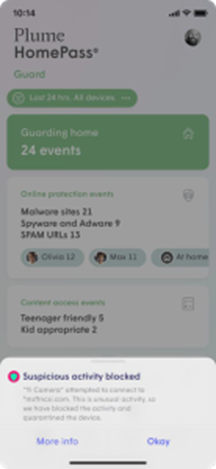
I see Plume HomePass® service Advanced IoT Protection blocked an event. Now what do I do?
If there is a suspicious activity blocked event, you probably received a push notification warning you that a smart home device went to a website which is considered unusual compared to its normal behavior. There is no required action on your end other than enjoying the peace of mind that Plume is protecting you and your family!
What is Plume HomePass® service Privacy Mode?
Plume’s Privacy Mode enables you to limit data from being sent to the Plume Cloud. This feature is configurable at the location level. It is Disabled by default, though you can always enable it by accessing the Guard tab of your HomePass app.

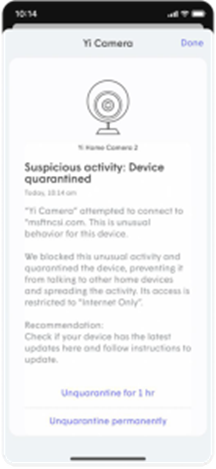
What if Plume HomePass® service Advanced IoT Protection blocks a site that is actually safe?
When an anomaly is detected, the device will automatically be placed into quarantine to protect the integrity of your network and the devices connected to it. Quarantining the device effectively places “Internet Only” permission on the device, allowing basic functionality while preventing access to your other home devices. Advanced IoT Protection (AIP) uses machine learning on device network metadata to establish known behaviors. However, sometimes safe sites can be flagged as a false positive. If a new behavior comes across our large training samples or if device behaviors are updated by the vendor, the device may be incorrectly flagged. Learning happens continually to establish new normal behaviors, however can cause some alerts in the interim. If you trust the website the device is accessing, you can whitelist it for the device and for all devices in the home. When Should I Remove a Device From Quarantine? You should only remove a device from quarantine if you trust the website it was trying to access. On a quarantined device, there is a recommendation which will open a web search for the device’s manufacturer website, so you can do more research or find an updated firmware before removing the device from quarantine. Removing a Device from Quarantine
- Open the device list and navigate to the Internet Only devices.
- Find the affected device. The affected device will be labeled: Device is quarantined.
- Tap on the quarantined device for more options.
- You can choose Unquarantine for 1 hour or Unquarantine permanently.
How can I tell if someone is home with my Plume HomePass® service?
- From the Home screen and tap on the Guard events button.
- The Protected tab will display all blocked events.
- You can sort the list of events shown below by type of event or by choosing a person.
- Simply tap on any event to add the site to the Approved list if you trust that it is actually safe.
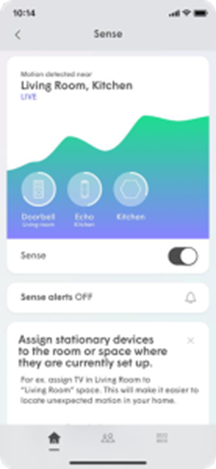
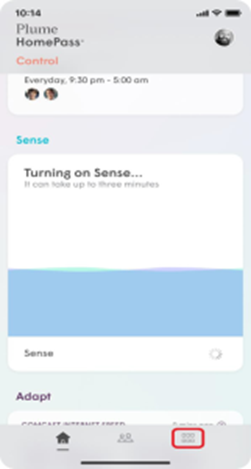
What is the Plume HomePass® service Sense™?
With Sense™ existing smart devices become motion detectors without the use of cameras, in order for you to gain whole-home awareness. The HomePass® app shows you movement in the vicinity of each connected device or room on your network.
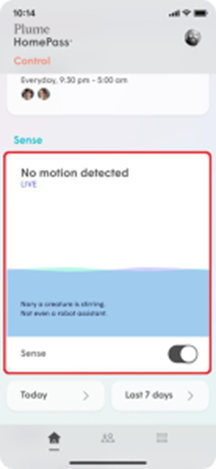
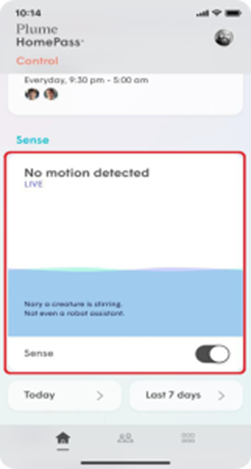
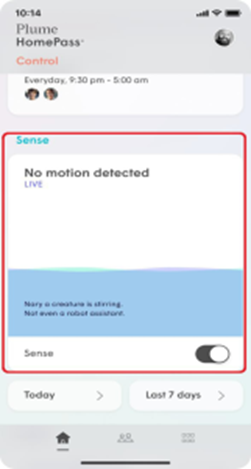
Plume HomePass® service Sense Live View
Live View allows you to see both the location and intensity of the detected motion in real-time.

- From the home screen, Scroll to the Sense section.
- The Live View will be available on the home screen. If you want to see more details tap on the Sense section.
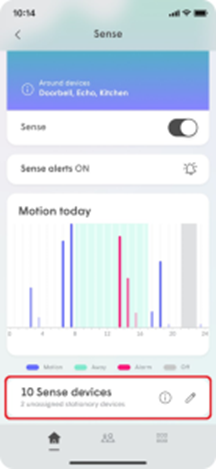
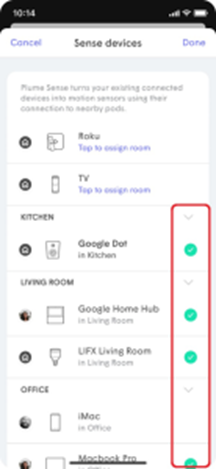
How to choose your Motion Detection Devices using the Plume HomePass® service
How are devices chosen to detect motion? Sense uses a behind-the-scenes algorithm to pick from the Sense device list devices that are best suited for motion detection. Modifying the Sense device list The pool of available devices (Sense device list) from which the algorithm chooses is based on all WiFi devices currently connected to a Pod, excluding mobile devices. This Sense device list can be modified by you to limit motion detection in certain areas. We recommend leaving all devices in the Sense Devices list selected for optimal performance, but if you would like to manually choose which devices can be used, the following guidelines will help you get the most coverage in your home.
- If you want to limit motion detection in certain areas of your home, deselect devices in those areas.
- Although Sense will keep most mobile devices separate, ensure you choose devices that will remain static.
- Avoid choosing devices that are battery operated or may frequently go into a low-power state. Always-on devices such as voice assistants and other smart home devices are good candidates.
- Since Pods are already being used to detect motion, avoid choosing devices that are either in the same room or very close to them.
- To better refine the motion sensitivity, use the Live View feature to test the motion detection in each room.
- From the home screen, scroll down to the Sense section and tap on the Live view.
- Scroll down and tap on the pencil icon next to Sense devices.
- Remove the green checkmark next to any device you do not want to be used for motion detection or add a green checkmark next to devices you want to be used.
- Be sure to assign rooms to your devices if you haven’t already done so.
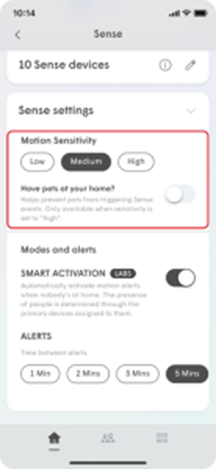
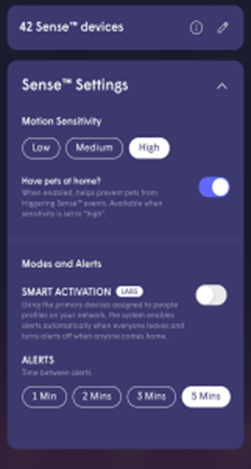
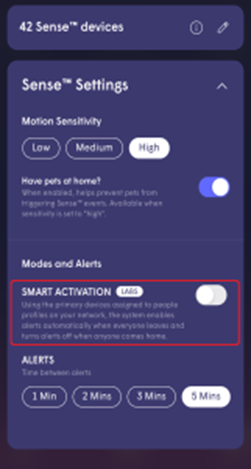
How to adjust Plume HomePass® service motion sensitivity?
Motion sensitivity may need to be adjusted for the following reasons:
- Improve motion detection sensitivity, particularly if you have only a few Pods and/or WiFi connected devices
- There are obstructions that are making it difficult for your Pods and devices to detect motion in some areas.
- You are getting too many false motion alerts because of your pets or robotic vacuums.
- Low (less sensitive to motion intensity)
- Medium (default)
- High (more sensitive to motion intensity)
- Scroll down on the Home page and Tap on the Sense.
- Scroll down to the bottom of the page and open Sense Settings.
- Choose your Motion Sensitivity option and toggle the Pet mode (optional)
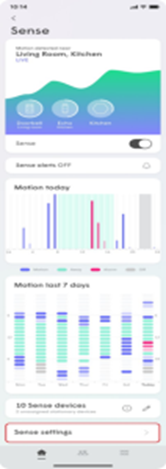
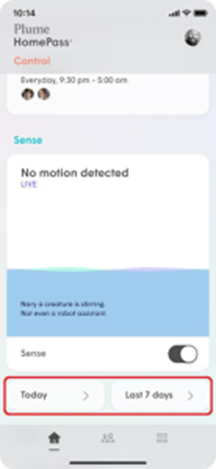
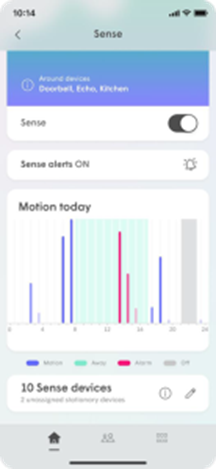
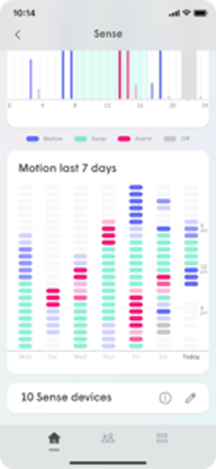
How do I access my Plume HomePass® service home’s motion history?
What is kind of motion history is displayed? There are two available historical views:
- Motion Today – Each column represents an hour.
- Motion Last 7 Days – Each segment represents 1 hour.

- Blue– Motion was detected (System unarmed)
- Red– Motion was detected when people are away (System armed) and triggered a Sense Alert
- Green – All people are away (System armed) and no motion is present in the 7-day view. Layered in the background of the Today view.
- Grey– Plume Sense motion detection was turned off in the 7-day view. Layered in the background in the Today view.
- The degree of transparency represents the intensity of the motion at the time.
- From the home screen, scroll down until you get to the Sense section.
- Tap on either the Today or Last 7 days buttons to view that historical view.
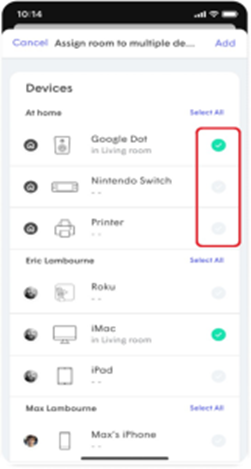
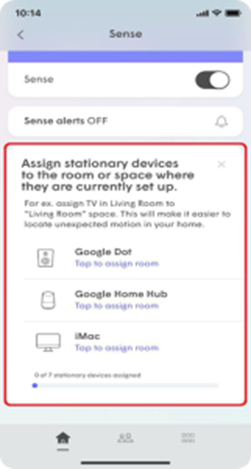
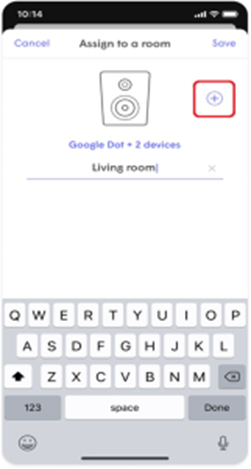
How do I create rooms with my Plume HomePass® service?
The HomePass App allows you to group your devices into rooms to improve motion detection accuracy. For example, if your living room has a smart TV, smart speaker, and voice assistant, motion detection on any of these devices can be localized to your living room! Creating rooms
- From the home screen, enable Sense. Once Sense is enabled, a list of eligible devices will begin to populate, and you will be prompted to assign devices to a room.
- Tap on one of the devices in the unassigned device list.
- Enter the name of the room for this device and tap on Save.
- If there is more than one device in that room, tap on the + icon.
- From the device list, add a green checkmark next to all the devices in that room and tap on Add.
- From the unassigned device list, tap on another device and repeat the previous three steps until all devices have been assigned a room.
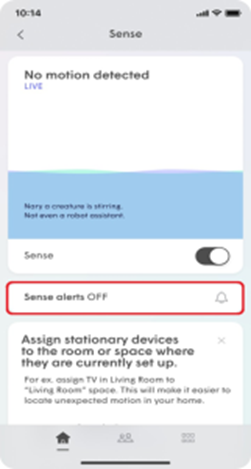
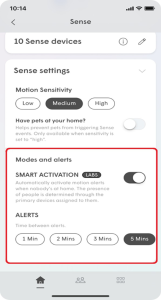
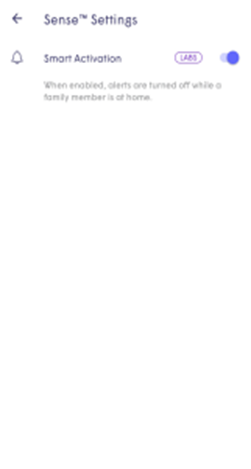
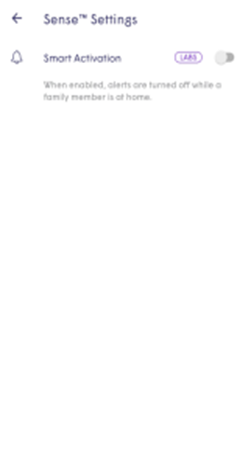
How do I set up Plume HomePass® service Sense motion alert notifications?
When Sense Alerts is enabled, push notifications will be sent to your device whenever the system detects motion. You can enable these notifications to send at all times or only while nobody is at home using the Smart Activation feature. You need to assign a Primary device to everyone to ensure Sense can properly determine if everyone has left and also enable the People notifications. Enable Notifications
- Scroll down to the Sense section on the Home Screen and tap on it.
- Scroll down to the option Sense Alerts and tap on the Bell to enable the notifications.
- Tap on the Main Menu at the bottom of the screen and then tap on Sense.
- Under Modes and Alerts, slide the Smart Activation toggle to the right if you do not wish to receive alerts while you are home.
- Under the Alerts section, you can set the minimum Time between alerts to either 1Mins, 2 Mins, 3 Mins, or 5 This prevents you from getting too many notifications if a motion alert gets triggered immediately after another one.
- Scroll back up to the top of the screen to turn Sense alerts from ON to OFF.
- Sense motion detection is enabled.
- Sense Alerts are enabled.
- If the Smart Activation of alerts has been enabled, everyone has left your home. (all assigned primary devices have been disconnected for 15 minutes or more)
- The motion being detected occurs for at least 2 seconds (5 seconds if pet mode is enabled), within an approximate 10′-13′ radius from a motion detection device or SuperPod.
- The minimum time interval since the last alert has been met.
Why am I not receiving Plume HomePass® Sense notifications when there is motion in my home?
These are the most common reasons for not receiving Sense Alerts:
- Push notifications may have been disabled on your device. iOS – Enable push notificationsAndroid – Enable Push notifications
- The motion being detected is not enough to trigger a Sense alert. Alerts are triggered only if the motion event lasts at least 2 seconds (5 seconds with pet mode enabled) and within approximately 10-13 feet of a SuperPod or Sense enabled device.
- The sensitivity is set too low for the amount of motion present.
- Sense Alerts have been turned off.
- Unless Smart Activation is disabled, notifications will not be sent if you and your other family members are home.
- When Smart Activation has been enabled for Sense alerts, all Primary devices assigned to people must have disconnected from the network for at least 15 minutes. This also means that if someone leaves their primary device at home, alerts will not go out.
- Depending on your notification interval settings, not enough time has elapsed since your last alert.
Why am I still receiving Plume HomePass® Sense motion notifications while I’m home?
Other than Smart Activation for Sense alerts not being enabled, the most common reason you may still be getting Sense alerts while you are home is that Primary devices have not been assigned to people or People profiles have not been created. Your Home / Away status is based on when all assigned primary devices have disconnected from the network. If you have not assigned any primary devices to people, your current status will always be away and notifications will always go out if there is motion.
How can I change the WiFi network code?
If you have the Plume Homepass® service, follow these 3 simple steps: 1. Go to the Settings option and then the Adapt option.
Purple Max Internet 1G
What is Purple Max Internet 1G?
Purple Max Internet 1G is the new Internet service that offers 1 Gbps connection . Additionally, Purple Max Internet 1G includes the Plume HomePass® service, which provides the ultimate WiFI connectivity experience in the whole house.
What is the maximum connection speed?
The Cablenet network is being continually upgraded. Download speeds can reach up to 1Gbps. The Purple Max Internet upload speed is 50Mbps.
What are the benefits having a Purple Max Internet 1G?
- You will enjoy a smart, secure and fast WiFi system, and the ultimate experience of living in a “smart” home.
- You will enjoy carefree and simplicity, with this one single choice.
- You can get the Purple Max Mobile at the reduced price of only €20/month, if you combine it with Purple Max Internet.
How can I connect to the Internet using my mobile?
In instances where the APN does not appear automatically, you will have to select it as follows: Internet settings for iPhone devices:
- On the home screen, select Settings
- Select Cellular
- Select Cellular Data Network
- Select APN
- Type cablenet
- Select Menu to save settings
- Select Apps
- Select Settings
- Select Wireless & Networks or Connections
- Select More Networks or More Settings
- Select Mobile Networks
- Select Access Point Names
- Select the Menu button
- Select New APN
- Select Name
- Type cablenet and press OK
- On the home screen, slide your finger to the left
- Select Settings
- Select Mobile Network
- Select Add Internet APN
- Type cablenet
How can I create a hotspot?
Mobile hotspot can be activated on Android by heading to Settings > Network & internet > Hotspot & tethering, and toggle on Use Wi-Fi hotspot.
For iPhone devices, go to Settings > Cellular > Personal Hotspot or Settings > Personal Hotspot. Then tap the slider next to Allow Others to Join.
What should I do if there is a network coverage issue in my area?
Please contact our Customer Service Centre on 130 so that we can check coverage in your area.
Why can’t I make any calls?
When you can’t make any calls, the most likely reason is that outgoing calls from your mobile have been blocked, either through your device or due to an outstanding balance. For more information, please call the Customer Service Centre on 130.
Why is my mobile’s signal strength not always steady?
Your mobile’s signal strength is directly affected by the distance between you and the tower transmitting the signal. As the distance between you and the tower increases, the signal strength will weaken until you connect to another signal-transmitting tower which is closer to your location.
I can’t send SMS messages. What should I do?
If you can’t send SMS messages from your mobile, check SMS settings on your device and ensure that the number of the message centre is +35794066666.
In how many sizes is the SIM card available?
The SIM card is available in three sizes: SIM, MicroSIM και NanoSIM.
Could I have a second SIM card with the same number?
twinSIM’ service.
What should I do if the phone keeps asking for a PIN or PUK?
PIN & PUK information is available on the reverse side of the SIM card. If you have lost this information, please call the Customer Service Centre on 130 so that we can give you the PUK and you may subsequently set your new PIN. The information can only be given to the owner of the SIM card.
What is the ICCID number and where can I find it?
Each SIM card has a unique international identification number. This is the ICCID number and it is printed on each SIM card.
Where can I find my device’s IMEI?
The IMEI number is printed under your device’s battery and on the device’s packaging. It will also appear on your screen when you dial *#06#. We suggest you write down your device’s IMEI number because you will need it if you lose your mobile.
How will I be charged if I used my mobile overseas?
All Cablenet Mobile subscribers can enjoy low roaming charges for voice calls, sending of SMS and data transfer, provided that they connect to one of the networks with which our company collaborates. For any calls made or received, you will be charged according to the billing zone of the country in which you are located and the network to which you are connected.
What network speed will I have with my mobile service?
The network speed you will have with your mobile service is 4G.
How can I contact the Customer Service Centre when I’m overseas?
If you are overseas, you may contact the Customer Service Centre on +357 22255130.
Are there any credit limits on my mobile plan that I should be aware of?
Yes, all Cablenet mobile plans are subject to a default Credit Limit. Your Credit Limit is set at €50 and is consumed whenever you may use your mobile line for any “out-of-bundle” services. Out-of-bundle consumption includes additional minutes or SMS beyond your inclusive credits, calls to international destinations, roaming usage not covered by the RLAH rules (see Roam Like at Home), and usage of local premium services and calls to special numbers. For more information call 130.
Can I increase my default credit limit on my mobile plan?
Yes, if the default spending limit is depleted and you would like to boost your default spend limit by €20 for an additional 30 days, you can do so by sending an SMS to 8844 with the code CL20. If you would like to increase it by more than €20 please call 130.
Why can’t I call or SMS anyone?
- Try optimizing your device by turning it OFF and then back ON or by setting Airplane mode ON and then OFF.
- Try to use another roaming partner by manually selecting it on the device. You can find our roaming partners at:
- For monthly plans, click here and select “Roaming Operators” under the Roaming section
- For prepaid plans, click here and select “Roaming Operators” under the Roaming section
- Change the setting in “SIM Toolkit” from Automatic to Manual.
- Check if you are using the country prefix code (i.e. Cyprus +357xxxxxxxx).
I have the Internet plug&surf service. Can I use it while in an EU country?
Currently, Internet plug&surf is only available for surfing within Cyprus and cannot be used while roaming.
What do I need to be aware of when traveling near country boarders?
To avoid any unwanted charges when traveling near country borders it is recommended that you use manual rather than automatic mobile network selection on your mobile device and always check the name of the network provider on your phone before using it. Also, you can turn data roaming off in your mobile device’s settings for you to avoid any accidental data roaming charges.
What does the Missed Call Notification service do?
After its activation, you'll be notified of every call you missed, even when your phone is switched off or out of range.
What does the Missed Call Notification service’s text message include?
The text message includes information such as the phone number that called you, the number of missed calls and the date and time of the missed calls.
Is there a limit on the number of Missed Call Notifications I can receive within one day?
There is no limit.
Why does the notification message say ‘Unknown’?
'Unknown' appears when Caller ID has been blocked by the caller.
How can I deactivate the Missed Call Notification service?
To deactivate the service, you must text MCN OFF to 8844. You wil then receive a text message via SMS confirming that the Missed Call Notification service has been deactivated.
Will the service work when I’m overseas?
Yes. You'll receive notification of missed calls even when you're roaming.
Can I send a text message to 8844 while I’m overseas?
Yes. You can send a text message via SMS to 8844 while you're roaming. The service's activation and deactivation procedures remain the same.
I have activated the Missed Call Notification service and see the number +35722250159 in the Call Forwarding settings. Why?
When the service is activated, the system automatically sets call forwarding to +35722250159. This is a basic setting for its correct operation.
What will happen if I delete or replace the number +35722250159 from call forwarding on my mobile phone?
If you delete or replace the number +35722250159 from the device's call forwarding, the Missed Call Notification service will not function. You can add the number +35722250159 by typing it in or reactivating the service.
If the SMS Center of my mobile device is wrong will I be able to receive SMS from CablenetMCN sender?
Yes, you'll be able to receive these specific messages however you won't be able to send texts via SMS. The correct number for the SMS Centre is +35794066666.
How can I set the APN internet settings on my mobile?
For iPhone devices:
- On the home screen, select Settings
- Select Cellular
- Select Data Network
- Select APN
- Type cablenet
- Select Menu to save settings
- Select Apps
- Select Settings
- Select Wireless & Networks or Connections
- Select More Networks or More Settings
- Select Mobile Networks
- Select Access Point Names
- Select the Menu
- Select New APN
- Select Name
- Type cablenet and select OK
How can I transfer my prepaid mobile number from another provider to Cablenet?
You can visit any one of our stores or apply online. Activation will be completed two working days after the date of the transfer from another provider to Cablenet.
How can I transfer my number from another provider to Cablenet?
You can visit any one of our stores and present your ID card/passport and a recent bill from your current provider. Activation will be completed two working days from the date of number transfer from the previous provider to Cablenet. You can see available packages and choose whichever suits your needs here.
How can I transfer balance to another Cablenet Prepaid user?
Type *121*Cablenet Prepaid number you wish to transfer balance to*desired amount# and press Call (e.g. *121*94xxxxxx*5#). Both Cablenet Prepaid numbers will receive a text message confirming the successful transfer.
Can I transfer my current mobile number to the Cablenet Prepaid service?
Yes, you can transfer your number at any Cablenet Store or online by clicking here.
Can I use my Cablenet Prepaid line overseas?
Yes, you can use it overseas. For further information regarding roaming charges, click here. Please remember that Gimme packages are not active when the subscriber is overseas. Charges incurred during roaming will be deducted from the account balance using top-up cards.
How can I transfer my existing mobile number to Cablenet?
You can transfer your line to Cablenet easily and without any charge. The application process can be done either at any Cablenet store or online. We will take care of the rest. We’ll call you to complete the process and inform you about all the next steps. You just need to replace your SIM card when you receive the relevant SMS. Required documents:
- ID / Passport number
- Previous bill from the current provider
How can I check my mobile plan available balance?
Just dial *101# and use the interactive menu. When you check your available balance (using *101#), the balance displayed is the available balance in your bundle.
Which bands does the Cablenet mobile network support?
The Cablenet mobile telephony network supports B7 – 2600MHz and B20 - 800MHz bands.
I want to cancel my subscription, and my contract hasn’t expired yet. What do I need to pay?
New subscribers: early termination fees for a 24month contract
|
Termination Month |
Administration Charge | Installation Charge | Services Used Charge |
TERMINATION FEE |
|
0 – Activation Month |
€25.00 | €60.00 | €0 | €85.00 |
|
1 |
€25.00 | €57.50 | €0 |
€82.50 |
| 2 | €25.00 | €55.00 | €0 |
€80.00 |
|
3 |
€25.00 | €52.50 | €0 | €77.50 |
|
4 |
€25.00 | €50.00 | €0 | €75.00 |
| 5 | €25.00 | €47.50 | €0 |
€72.50 |
| 6 | €25.00 | €45.00 | €0 |
€70.00 |
|
7 |
€25.00 | €42.50 | €0 | €67.50 |
|
8 |
€25.00 |
€40.00 | €0 |
€65.00 |
| 9 | €25.00 | €37.50 | €0 |
€62.50 |
|
10 |
€25.00 |
€35.00 | €0 | €60.00 |
|
11 |
€25.00 | €32.50 | €0 | €57.50 |
| 12 | €25.00 | €30.00 | €0 |
€ 55.00 |
| 13 | €25.00 | €27.50 | €0 |
€52.50 |
|
14 |
€25.00 |
€25.00 | €0 | €50.00 |
| 15 | €25.00 | €22.50 | €0 |
€47.50 |
|
16 |
€25.00 | €20.00 | €0 | €45.00 |
| 17 | €25.00 | €17.50 | €0 |
€42.50 |
|
18 |
€25.00 | €15.00 | €0 | €40.00 |
|
19 |
€25.00 | €12.50 | €0 |
€37.50 |
| 20 | €25.00 | €10.00 | €0 |
€35.00 |
|
21 |
€25.00 | €7.50 | €0 |
€32.50 |
|
22 |
€25.00 | €5.00 | €0 |
€30.00 |
| 23 | €25.00 | €2.50 | €0 |
€27.50 |
| 24 | €25.00 | €0 | €0 |
€25.00 |
| Termination Month | Administration Charge | Installation Charge | Services Used Charge |
TERMINATION FEE |
|
0 – Activation Month |
€25.00 | €0 | €0 |
€25.00 |
|
1 |
€25.00 | €0 | €0 |
€25.00 |
|
2 |
€25.00 | €0 | €0 |
€25.00 |
|
3 |
€25.00 |
€0 | €0 |
€25.00 |
|
4 |
€25.00 | €0 | €0 | €25.00 |
| 5 | €25.00 | €0 | €0 |
€25.00 |
|
6 |
€25.00 | €0 | €0 |
€25.00 |
|
7 |
€25.00 | €0 | €0 |
€25.00 |
|
8 |
€25.00 | €0 | €0 |
€25.00 |
|
9 |
€25.00 | €0 | €0 |
€25.00 |
|
10 |
€25.00 |
€0 | €0 |
€25.00 |
|
11 |
€25.00 | €0 | €0 |
€25.00 |
|
12 |
€25.00 | €0 | €0 |
€25.00 |
|
13 |
€25.00 | €0 | €0 |
€25.00 |
|
14 |
€25.00 | €0 | €0 |
€25.00 |
|
15 |
€25.00 | €0 | €0 |
€25.00 |
|
16 |
€25.00 |
€0 | €0 | €25.00 |
|
17 |
€25.00 | €0 | €0 | €25.00 |
|
18 |
€25.00 |
€0 | €0 | €25.00 |
|
19 |
€25.00 | €0 | €0 |
€25.00 |
| 20 | €25.00 | €0 | €0 |
€25.00 |
| 21 | €25.00 | €0 | €0 |
€25.00 |
| 22 | €25.00 | €0 | €0 |
€25.00 |
|
23 |
€25.00 | €0 | €0 | €25.00 |
| 24 | €25.00 | €0 | €0 |
€25.00 |
eSim
What is the difference between an eSIM and a SIM?
The main difference between a SIM card and an eSIM is the physical presence. A SIM is a physical card that needs to be inserted into a device, while an eSIM is embedded into the device’s hardware. This allows the user to use mobile services without the need of a physical card.
How does eSIM work?
The eSIM does exactly what a physical SIM would do. The only difference is that instead of inserting it in your device, you scan a QR code which contains all the data required for your device to establish a connection with Cablenet’s network.
Is my eSIM QR code unique?
Yes, eSIM QR codes are unique. Each eSIM has its own distinct QR code that contains specific information related to the connected subscription. Once the QR code is scanned and as long as the eSIM is activated on your device, the QR code becomes inactive and cannot be used again. This unique QR code ensures that only your device can access and activate the eSIM associated with your subscription.
How can I change to an eSIM?
You can visit one of Cablenet shops to swap your physical SIM with an eSIM. The charge for the change will be according to the Company’s Pricelist.
How do I set up my eSIM?
- Get an eSIM Voucher from a Cablenet store.
- Go to the device settings and find the eSIM or cellular settings section.
- Choose the option to add or enable an eSIM profile.
- Scan the provided QR code.
- Follow the on-screen instructions to complete the eSIM activation process.
How many eSIM profiles can I have on my eSIM?
You can have only one profile per eSIM.
How many eSIM profiles can I have on my device?
The number of eSIMs a device can have depends on the device’s capabilities, but many modern devices support multiple eSIM profiles.
Is my device eSIM compatible?
You can check if your device is included in our supported eSIM devices, by checking the list with the certified devices listed in the section above.
What is the charge for eSIM?
There is no specific up-front cost for eSIMs, apart from the Mobile Service Registration Fee which is charged for all new mobile subscriptions.
How safe is eSIM?
eSIM technology is secure and uses encryption and authentication protocols like a physical SIM card.
Where can I find my PIN and PUK numbers?
The PIN and PUK codes can be found on the eSIM Voucher.
Which mobile services work with eSIM?
All mobile services can be used with an eSIM, exactly as they would with a physical SIM.
If I change to an eSIM will i still be able to use my old SIM card?
With the activation of the eSIM, your physical SIM will be deactivated.
How many eSIMs can I have with the same number?
Only one number can be active per eSIM.
Can I have both physical SIM and eSIM on my device?
That depends on your device. If the device supports it then you can use a physical SIM and an eSIM simultaneously.
What happens if I lose my phone?
In the event that your phone has been stolen or lost, you should immediately contact our Call Center (130) for the deactivation of the eSIM, to prevent it’s unauthorized use. We will be able to replace your eSIM at any Cablenet shop. The charge for the replacement will be according to the Company’s Pricelist.
How do I uninstall my eSIM from a device?
- Go to the device settings and look for the eSIM or cellular settings section.
- Find the option to manage or remove eSIM profiles.
- Select the eSIM profile you would like to remove and follow the instructions.
Is there a limit on how many times i can transfer my eSIM to another device?
You may transfer your eSIM to another compatible device up to 6 times. After that you will need to obtain a new eSIM Voucher.
If I perform a factory reset of my device, will my eSIM profile be affected?
Unless the eSIM is deleted from the device, it will not be affected.
Can I still use my eSIM if I travel abroad?
Yes, eSIM can be used abroad in the same way as a physical SIM.
Can I switch back from an eSIM to a physical SIM?
Yes, you can switch back to a physical SIM by visiting a Cablenet store.
Can I transfer my eSIM to a new device?
Yes, you can install the eSIM to a new device after deleting it from your existing device. You can then reinstall the eSIM by scanning the QR code on your eSIM Voucher on your new device.
My device is not supported by your network for eSIM at the current time. Are you planning to include more eSIM supported devices in the future?
Yes, new eSIM supported devices will be added on a regular basis and the certified devices will be listed in the section above.
eSim Basic
What’s the difference between a SIM card and an eSIM?
The main difference between a SIM card and an eSIM is physical presence. The SIM is a physical card that must be inserted in a device, whereas the eSIM is embedded in the device. This allows the user to use mobile services without the need for a physical card.
How does an eSIM work?
An eSIM does exactly what a physical SIM card does. The only difference is that, instead of inserting it into your device, you scan a QR code which provides all the data that your device needs in order to establish a connection with Cablenet’s network.
Is my eSIM QR code unique?
Yes, eSIM QR codes are unique. Every eSIM has its own unique code that contains specific information regarding the connected subscription. As soon as the QR code is scanned and for however long the eSIM stays activated on your device, the QR code is deactivated and can not be reused. This unique QR code ensures that only your device has access to and can activate the eSIM connected to your service.
How can I change to an eSIM?
You can visit any Cablenet store and swap your physical SIM card to an eSIM. The charge for the change will be according to the Cablenet Pricelist valid at that time.
How do I activate my eSIM?
- Get an eSIM Voucher from a Cablenet store.
- In your device’s settings, locate the eSIM or mobile settings.
- Select the option to add or activate an eSIM profile.
- Scan the Voucher’s QR code.
- Follow the on-screen instructions to complete the eSIM activation process.
How many eSIM profiles can I have on my eSIM?
You can have only one profile per eSIM.
Is my device eSIM compatible?
You can check if your device is included in the devices supported by our eSIM service in the above list of certified devices.
How much does an eSIM cost?
There is no upfront cost for eSIMs, aside from the Mobile Telephony Service activation fee that applies to all new Mobile Telephony subscriptions.
How safe is an eSIM?
eSIM technology is safe and uses encryption and authentication protocols, just like a physical SIM card does.
Where can I find the PIN and PUK numbers?
The PIN and PUK codes are printed on the eSIM Voucher.
Which mobile telephony services work with an eSIM?
You can use all mobile telephony services with an eSIM, exactly as you would with any physical SIM card.
If I switch to an eSIM, will I still be able to use my existing SIM card?
Your physical SIM card will be deactivated upon activation of the eSIM.
How many eSIMs can I have with the same number?
Only one number per eSIM can be active.
Can I have both a physical SIM card and an eSIM on my device at the same time?
That depends on your device. If your device supports it, then you can use both a physical SIM card and an eSIM at the same time.
What happens if I lose my mobile?
If your mobile is stolen or lost, you must contact the Customer Call Centre on 130 (+357 22255130 from abroad) immediately, so that we can deactivate your eSIM and prevent the possibility of its unauthorised use. We can replace your eSIM at any Cablenet store. Replacement will be charged according to the Cablenet Pricelist valid at that time.
How can I uninstall my eSIM from a specific device?
- In your device’s settings, locate the eSIM or mobile settings.
- Locate the option to manage or uninstall an eSIM profile.
- Select the eSIM profile you wish to uninstall and follow the on-screen instructions
Is there a limit to how many times I can transfer my eSIM to another device?
You can transfer your eSIM to another compatible device up to 6 times. After that, you will have to get a new eSIM Voucher.
If I restore my device to factory settings, will it affect my eSIM profile?
The eSIM will not be affected unless it is completely deleted from the device.
Can I still use my eSIM when I’m travelling overseas?
Yes, the eSIM can be used overseas, just like a physical SIM card would.
Can I switch back from an eSIM to a physical SIM card?
Yes, you can visit any Cablenet store and revert to a physical SIM card.
Can I transfer my eSIM to a new device?
Yes, you can install the eSIM to a new device after you first delete it from your current device. You can then reinstall the eSIM on your new device by scanning the QR code on your eSIM Voucher.
Your network doesn’t currently offer eSIM support for my device. Are you planning to include more eSIM-compatible devices in the future?
Yes, new devices that are supported by our eSIM service will be added at regular intervals. You can see the updated list of certified devices in the above section.
Missed Call Notification
How can I activate Missed Call Notification?
To activate the Missed Call Notification service, send SMS the keyword MCN ON to 8844. The service will be activated automatically and you will receive confirmation via SMS. For more information, click here.
What does the Missed Call Notification service do?
After its activation, you'll be notified of every call you missed, even when your phone is switched off or out of range.
What does the Missed Call Notification service’s text message include?
The text message includes information such as the phone number that called you, the number of missed calls and the date and time of the missed calls.
Is there a limit on the number of Missed Call Notifications I can receive within one day?
There is no limit.
Why does the notification message say ‘Unknown’?
'Unknown' appears when Caller ID has been blocked by the caller.
How can I deactivate the Missed Call Notification service?
To deactivate the service, you must text MCN OFF to 8844. You wil then receive a text message via SMS confirming that the Missed Call Notification service has been deactivated.
Will the service work when I’m overseas?
Yes. You'll receive notification of missed calls even when you're roaming.
Can I send a text message to 8844 while I’m overseas?
Yes. You can send a text message via SMS to 8844 while you're roaming. The service's activation and deactivation procedures remain the same.
I have activated the Missed Call Notification service and see the number +35722250159 in the Call Forwarding settings. Why?
When the service is activated, the system automatically sets call forwarding to +35722250159. This is a basic setting for its correct operation.
What will happen if I delete or replace the number +35722250159 from call forwarding on my mobile phone?
If you delete or replace the number +35722250159 from the device's call forwarding, the Missed Call Notification service will not function. You can add the number +35722250159 by typing it in or reactivating the service.
If the SMS Center of my mobile device is wrong will I be able to receive SMS from CablenetMCN sender?
Yes, you'll be able to receive these specific messages however you won't be able to send texts via SMS. The correct number for the SMS Centre is +35794066666.
Mobile Features
How can I activate Calling Line Identification Restriction (CLIR)?
You can selectively activate Calling Line Identification Restriction (CLIR) for a call by dialling #31# before the number you wish to call. If you wish to permanently withhold your number via your device, please refer to the manufacturer’s user manual or Mobile Supplementary Services.
How can I divert calls and how will I be charged?
The Call Forwarding Service enables you to divert received calls to any phone number of your choice within Cyprus. When you activate Call Forwarding to another number, you will be charged as if you are the one making the call from your number to the one to which your call has been diverted. Mobile telephony networks do not provide the ability to forward SMS or MMS messages. To activate the Call Forwarding Service, please refer to the manufacturer’s user manual or Mobile Supplementary Services.
How can I activate/deactivate blocking of 900 (premium rate) numbers?
Cablenet’s mobile network allows calls to 900 numbers by default. In order to block calls or unblock calls to 900 numbers from your mobile service, please call the Customer Service Center οn 130.
How can I activate Missed Call Notification?
To activate the Missed Call Notification service, send SMS the keyword MCN ON to 8844. The service will be activated automatically and you will receive confirmation via SMS. For more information, click here.
Portability
I am another company’s customer. Could I get Cablenet Mobile and keep the same number?
Of course. You can keep your existing number by following the number portability procedure. For more information regarding number portability, as well as the required documentation, please call the Customer Service Centre on 130. There is no charge for the transfer procedure.
How will I be notified that the portability procedure has been completed?
You will be notified via SMS on your mobile the day before the date set for the transfer. The new Cablenet SIM card will have to be placed in your mobile on the day and time set for the transfer in order to activate the service.
Can I transfer my current mobile number to the Cablenet Prepaid service?
Yes, you can transfer your number at any Cablenet Store or online by clicking here.
Post Paid
How can I transfer my number from another provider to Cablenet?
You can visit any one of our stores and present your ID card/passport and a recent bill from your current provider. Activation will be completed two working days from the date of number transfer from the previous provider to Cablenet. You can see available packages and choose whichever suits your needs here.
Prepaid
Where can I buy a Cablenet Prepaid SIM pack and Cablenet Prepaid top-up cards?
You can buy a Cablenet Prepaid SIM pack and Cablenet Prepaid top-up cards at any Cablenet Store, at selected Cablenet resellers, kiosks, and mini-markets. The SIM pack costs €2 and includes €1 of credit. There are 5 denominations of Cablenet Prepaid top-up cards: €2, €5, €10, €20 and €50.
How can I top-up my Cablenet Prepaid mobile account?
To top-up your account, you must purchase a Cablenet Prepaid top-up card. Then dial *103*14-digit code# and press Call. You will receive a text message confirming the amount that has been credited to your account.
How often can I top-up my account?
You must top-up your account each time you run out of credit or your credit expires. Each top-up card is unique so, if you top up your account using multiple top-up cards, each card will expire according to its own expiry time. Cablenet Prepaid Top-Up cards have the following expiry dates: €2 cards expire after 30 days, €5 cards expire after 180 days and cards for €10 or more expire after 365 days.
Will my Cablenet Prepaid balance be transferred if I do not use it within the validity period?
No, the remaining unused balance will not be transferred and will not be added to another top-up card balance.
How can I check my Cablenet Prepaid available balance?
Just dial *101# and use the interactive menu. When you check your available balance (using *101#), the balance displayed is the sum of all remaining valid top-up credits and Gimme prepaid plan credits.
How can I transfer money to another Cablenet Prepaid user?
Simply dial *121* followed by the Cablenet Prepaid number, then *, then the desired amount #, then press DIAL(e.g. *121*94xxxxxx*5#). Both parties will receive a confirmation SMS after the successful transfer.
What are the Gimme prepaid plans?
The Gimme prepaid mobile plans offer value for money for talk time, text messages (SMS), and data. For more information and Gimme plan options, click here.
How can I buy a Gimme prepaid plan and what are the costs?
Once you have topped up your account, you can purchase any Gimme prepaid package by dialing *141# and then selecting the Gimme package you want to activate. ‘Gimme’ costs €4, ‘Gimme Asia’ costs €5, ‘Gimme More’ costs €8, ‘Gimme Data’ costs €10, ‘Gimme Max’ costs €20 and ‘Gimme 500’ costs €25.
Can I transfer any mobile number to Cablenet Prepaid service?
Yes, you can transfer your number at any Cablenet Store, or online by clicking here.
Can I use my Cablenet Prepaid number when traveling abroad?
Yes, you can use your Cablenet Prepaid service when abroad. For more information on the roaming rates, click here. We remind you that, Gimme plans are not active while roaming. The occurring charges are deducted from the account balance through top-up cards.
How can I transfer my prepaid mobile number from another provider to Cablenet?
You can visit any one of our stores or apply online. Activation will be completed two working days after the date of the transfer from another provider to Cablenet.
How can I transfer balance to another Cablenet Prepaid user?
Type *121*Cablenet Prepaid number you wish to transfer balance to*desired amount# and press Call (e.g. *121*94xxxxxx*5#). Both Cablenet Prepaid numbers will receive a text message confirming the successful transfer.
Can I transfer my current mobile number to the Cablenet Prepaid service?
Yes, you can transfer your number at any Cablenet Store or online by clicking here.
Can I use my Cablenet Prepaid line overseas?
Yes, you can use it overseas. For further information regarding roaming charges, click here. Please remember that Gimme packages are not active when the subscriber is overseas. Charges incurred during roaming will be deducted from the account balance using top-up cards.
What is the Gimme Asia prepaid plan?
With the Gimme Asia mobile plan, you can communicate with countries in Asia at lower charges.
| Calls to |
Available minutes |
Call Rate per minute (incl. VAT) |
| Bangladesh |
180 |
€0.0278 |
| India |
120 |
€0.0417 |
| Nepal |
25 |
€0.2000 |
| Pakistan |
90 |
€0.0556 |
| Philippines |
30 |
€0.1667 |
| Sri Lanka |
25 |
€0.2000 |
| Vietnam |
50 |
€0.1000 |
| China |
150 |
€0.0333 |
| Examples | |||
| Calls to 1 destination |
India 120 mins |
- |
- |
| Calls to 2 different destinations |
Bangladesh 90 mins |
India 60 mins |
- |
| Calls to 3 different destinations |
India 40 mins |
Philippines 10 mins |
China 50 mins |
Purple Max Mobile
Are my Minutes, SMS and Mobile Data truly unlimited with Purple Max plan?
Yes, your Purple Max Minutes, SMS and Mobile Data are truly unlimited.
Will my Mobile Data ever be throttled with Purple Max plan?
We will never throttle your Mobile Data speed with Purple Max plan. Instead, you will always have access to our best available speeds.
Will I be locked into a 24-month contract when signing up to Purple Max plan?
No, with Purple Max plan you will be free to leave whenever you like, without a termination fee, by simply giving us 30 days-notice. This applies to all our Cablenet mobile plans.
What is the Cablenet Mobile Fair Usage Policy?
In order to avoid network congestion and to protect the quality of service provided to customers, Cablenet implements a Fair Usage Policy, which provides that the Purple Talk plan, which include unlimited local minutes and local SMS and the Purple Max plan, which include unlimited local minutes, local SMS and local Data are offered only for interpersonal communication and for private, personal use of the service. Under no circumstances is their use allowed for profit purposes or for resale of the service. Interpersonal communication in this respect refers to the standard person-to-person calls and sending of SMS from the hand of a human. Therefore, unlimited use is prohibited for multiple simultaneous calling, conference calling, re-supply, call centre usage, telemarketing, bulk messaging, application-to-person communication, continuously call forwarding, auto-dialing, machine to machine communication, Cellular Trunking Units (CTUs), or any other activity that Cablenet considers to be non standard usage or not fair. In case of breach of this condition, Cablenet has the right, upon notice of the customer to apply charges, to transfer the client to another program and/or disconnect temporarily or permanently terminate the service without any further notice.
Roaming
Can I use my mobile data while roaming in the EU?
Yes, you can use your mobile data, at no extra charge, when travelling to EU countries, Iceland, Lichtenstein, Norway, Gibraltar and Monaco, so that you can enjoy carefree communication, as if you’re still in Cyprus. The EU data roaming limit for mobile plans are: Mobile Basic 50MB limit, Purple 1 1GB limit, Purple Mobile 9GB limit, Purple Max Mobile 27.1GB limit
How can I contact Call Center support from abroad?
You can contact Call Center support from abroad by dialing +357 22255130
What is the data limit while roaming in the EU?
You can use your plan’s available data in European Union, without any additional charge (Mobile Basic: 50MB limit, Purple 1: 1GB limit, Purple Mobile: 9GB limit). A Fair Usage Policy limit applies to the data you can consume within the European Union. The Purple Max plan is bound by a Fair Usage Policy, which sets a limit of 27.1GB/month within the European Union. If you do not have available data or the Fair Usage Policy Limit of your plan is reached, you can receive additional data by choosing a Data Booster, as described here. As soon as you consume 80% or 100% of your inclusive data within the European Union, you will be notified via a text message.
How will I be charged while roaming outside of the EU?
While roaming outside of the EU any Calls, SMS, or Mobile Data you use are not deducted from your mobile bundle. Instead, they are charged separately according to your usage and are deducted from your Monthly Credit Limit of €100.
What is the breakdown of Credit Limits while roaming outside of the EU?
There is a collective Monthly Credit Limit of €100 which is applied to Mobile Data, SMS, and Voice while roaming. Also, as a precautionary measure regarding any potential accidental data roaming charges, a limit of €50 applies specifically to your Mobile Data while you travel outside the EU. An SMS will be sent to you as you reach 80% of this amount and again a second SMS when you reach 100%. At this point, your mobile Internet will be suspended in order to avoid any additional charges that may occur. The usage for mobile data is deducted from both the Monthly Credit Limit and the Data Roaming non-EU Limit. Examples:
- I have used €50 on mobile data while roaming outside of the EU. My mobile data will be suspended and I will have €50 remaining to use for SMS and Voice Calls
- I have used €90 on Voice Calls and/or SMS while roaming outside of the EU. I will have €10 available to use for mobile data and/or Voice Calls and/or SMS.
Can I increase my Monthly Credit Limit?
Yes, you can send an SMS with the code CL20 to 8844 to increase your Monthly Credit Limit by €20 up to three (3) times per month. For information on how to further increase your Monthly Credit Limit, please contact our Call Center on +357 22255130.
How can I avoid high data roaming charges when roaming outside of the EU?
The best practice to avoid accidental data roaming charges is turning off your data roaming in your mobile device’s settings.
What are the rates while roaming outside the EU?
As soon as you turn on your mobile phone in the country you are visiting you will receive a “Welcome SMS” from us, which will inform you regarding calls (incoming and outgoing), SMS, and mobile internet rates that will be applied during your stay there. You can also find the roaming rates for the country you’re visiting, at the following link Roaming.
Why is my data not working?
If your mobile data connection is not operating properly, you need to verify that the APN is correct by following these steps: Android: Settings -> Mobile networks -> Access Point Names -> (Name: cablenet, APN: cablenet) You can also watch a step-by-step tutorial of the above steps here iOS: Settings -> Mobile data -> Mobile Data Options -> Mobile Data Network -> APN: cablenet You can also watch a step-by-step tutorial of the above steps here
I do not have an external antenna, but my house is connected to the Cablenet network. Do I need to install an external antenna to be able to watch the FTA Cypriot channels?
For coaxial cable connections, you don’t have to install an external antenna to watch Cypriot free-to-air channels if your premises are already connected to the Cablenet network. Digital signal in DVB–T format (terrestrial digital format) for Cypriot free-to-air channels, is also transmitted via the Cablenet network as it is transmitted by terrestrial digital service providers CyBC and Velister. It is therefore available in exactly the same way that you would have received it with an external antenna. For optical fibre connections, you must install an outdoor antenna to receive Cypriot free-to-air channels.
Do I need a decoder in order to use your TV service?
The Purple TV channel package requires a Cablenet decoder.
Can I watch different channels on different TV sets at the same time?
The Purple TV digital TV service requires a decoder and can be accessed from up to three viewing points in your home (a decoder per point is required).
Can the Cablenet TV channels be distributed to several rooms in a home?
For coaxial cable connections, the RF signal transmitted by Cablenet in DVB-T format as mentioned above can be distributed to any number of viewing points via the home RF distribution network in exactly the same way as a conventional aerial RF signal received by an antenna. Where DVB-C encrypted TV services are concerned, they can be installed at up to three points within the home via the home RF distribution network and the use of a Cablenet decoder. Depending on the number of terminals and the quality of the coaxial cabling of the home RF distribution network, the RF signal may need to be boosted. For optical fibre connections, rather than connecting the decoder via WiFi, networking and the use of ethernet cable within the home is recommended for optimal speed and the prevention of interference by neighbouring WiFi networks, low connection speed due to increased use of the WiFi network by other devices within the home, or weak WiFi signal due to the layout of the home’s interior. If you need any related assistance, kindly consult a network installation specialist. Please note that the Amino decoder can be installed at up to three points within the home.
Are there subtitles for the international channels?
Greek subtitles or dubbing are offered on the following subtitles: Movies Best, FOX, FoxLife, Cablenet Cinema, Novacinema 1-4, National Geographic HD, Discovery Channel, National Geographic, Nat Geo Wild HD, Animal Planet, Discovery Science, BBC Earth HD, History HD, ID, Disney Channel, Disney Junior, Boomerang HD, Baby TV, E! Entertainment, TLC, Motorvision HD, Edge Sport HD, Novasports Prime, Novasports 2-5, Novasports Start, Euronews GR.
How are TV channels transmitted to end users over the Cablenet network?
For optical fibre connections, the Amino decoder may be connected to the fibre-optic converter (usually the fibre-optic service modem) using an ethernet cable or alternatively use the ethernet connection within the home if that is provided. The Amino decoder supports WiFi connection, however ethernet connection is recommended for optimal connection quality, as well as optimal picture and sound quality. For further related information, please see the section below for advanced users.
What types of TV channel signals are transmitted over the Cablenet network?
The following types of TV channels are included in the RF signal transmitted via the Cablenet network (further information for advanced users is also available in the following section):
- a) DVB‑C (Digital Video Broadcast Cable)
- b) DVB‑T (Digital Video Broadcast Terrestrial)
- c) IP
How are the Cablenet interactive TV services transmitted?
Interactive TV services are transmitted via IP, the same protocol through which internet services are provided. To activate interactive services such as Replay TV (Catch-up TV) and Video on Demand (VOD), Cablenet’s Arion decoder must be connected to the Cablenet modem using a suitable ethernet cable. If the decoder is located near the modem, this is usually done by Cablenet’s technical staff during installation. Additionally, Cablenet’s Arion decoder must set to hybrid VOD Mode fromthe menu (Settings‑>System Mode) in order to activate interactive services. The Amino decoder needs a permanent internet connection for channels and interactive services to function, even if channels are received via coaxial cable.
How is the Cablenet Set Top Box (STB) connected to the TV?
To benefit from better transmission quality of the TV channels provided by Cablenet, such as picture quality in High Definition (HD) and digital sound, Cablenet’s decoder must be connected to the TV set using the HDMI cable provided. If this is not possible, a special RCA cable (which can be found at Cablenet stores) can then be used, however picture quality for HD channels will not be optimal. In addition, the Amino decoder will have to be connected to the modem via either ethernet or WiFi. It is recommended that the decoder is connected via ethernet cable rather than WiFi, for optimal quality and the prevention of interference by neighbouring WiFi networks, low connection speed due to increased use of the WiFi network by other devices within the home, or weak WiFi signal due to the layout of the home’s interior.
How many STBs can I have under the same Cablenet TV subscription?
Up to three decoders may be used per subscription in order to receive encrypted TV services such as Purple TV. These decoders may also be used for Cablenet interactive services, as long as each one is directly connected to the Cablenet modem using an ethernet cable. In the case of 24-month contracts for Cablenet packages that include TV services, the first decoder is provided free of charge. In all other cases, as well as for second or third points, decoders are provided with a monthly charge of €5 per decoder. For Purple TV Stream and Purple Sports Stream, the equipment cost is €90/decoder.
Can I watch the FTA Cypriot channels in parallel to watching on a Cablenet STB?
For coaxial cable connections, regardless of the number of Cablenet decoders used within a home under a single subscription, any other devices, such as TV sets or DVB-C or DVB-T receivers, can be used simultaneously to receive Cypriot free-to-air channels which are transmitted clearly by the Cablenet network. The only requirement is that distribution of the RF signal within the home is done correctly and that receiving devices are directly connected to RF distribution network via the RF-in port. Kindly consult a TV system installation specialist if you need assistance to do so. For optical fibre connections, you must install an external antenna to receive Cypriot free-to-air channels provided by terrestrial digital service providers such as CyBC and Velister. Kindly consult a TV system installation specialist if you need assistance to do so.
On which connector are Cablenet TV channels provided?
For coaxial cable connections, the RF signal transmitted by Cablenet, including all types of TV channel transmissions, is provided at a designated connector (with a screw-on threaded port called a female F‑type connector) on the isolator or the fibre converter for coaxial or optical fibre installations, respectively. Connection of the Cablenet decoder is done by Cablenet’s technical staff during installation, using a suitable coaxial cable (which is terminated with a male F‑type connector at one end). If connection to additional TV sets or the home RF distribution network is required, this can be done by a TV systems installation specialist or by the user themself if they are familiar with the required procedure, equipment and cables. N.B.: The internet connection signal via Cablenet’s coaxial network is delivered to a separate designated female F‑type connector on the isolator. Consequently, it is recommended that only authorised Cablenet technical staff or TV system installation specialists connect or disconnect cables from the isolator to avoid the risk of damaging the network or equipment. For optical fibre connections, channels are transmitted via ethernet cable connecting one of the available ethernet ports of the fibre-optic converter (usually the fibre-optic service modem) to the decoder’s ethernet port.
What is DVB C and what channels are provided through this transmission method on Cablenet’s network?
DVB-C stands for Digital Video Broadcast Cable and is the primary method for transmitting TV channels used by the Cablenet network as it is optimised for coaxial cable networks. All of Cablenet’s TV channels are transmitted in this format. Cypriot free-to-air channels are transmitted in an unencrypted format, while all other channels included in Cablenet’s TV packages are encrypted. For all information regarding Cablenet’s channels and TV packages, visit https://cablenet.com.cy/en/channels/ A Cablenet decoder is required to view Cablenet’s encrypted TV services and it is also used to view Cypriot free-to-air channels. Other devices capable of receiving DVB-C, such as TV sets with DVB-C (Digital Cable) tuners can be used to watch unencrypted free-to-air channels.
What is DVB T and what channels are provided through this transmission method on Cablenet’s network?
DVB-T stands for Digital Video Broadcast Terrestrial and is the method for transmitting TV channels usually used for terrestrial digital transmission, as done in Cyprus by CyBC and Velister. When transmitted aerially, DVB-T signals are usually received by a common domestic antenna. Cablenet retransmits all DVB-T channels on its cable network in exactly the same way as they are transmitted by CyBC and Velister. Consequently, every premises connected to Cablenet’s coaxial network, regardless of whether it is subscribed to Cablenet’s services or not, can receive Cypriot free-to-air channels without the need for an external antenna. All channels transmitted by CyBC and Velister can be received via DVB-T on the Cablenet network. Any devices capable of receiving DVB-T, such as TV sets with DVB-T (Digital Aerial) tuners or suitable DVB-T receivers, can be used to watch free-to-air channels.
What are the DVB-C broadcast frequencies on Cablenet’s network?
If you aren’t using a Cablenet decoder, the best way to tune DVB-C channels transmitted on Cablenet’s network is to use your TV set’s automatic digital cable scanning feature (or similar), if this is an option. For manual tuning, Cablenet DVB-C channels are broadcast between frequencies 610 MHz to 746 MHz. The tuning parameters are as follows: Modulation: QAM256 Symbol Rate: 6950 Network ID: 1 If a network tuning mode or option is available, it can be selected to speed up tuning. N.B.: Cablenet reserves the right to change the transmission frequencies and parameters of its DVB-C channel broadcast at its discretion at any time.
How can I watch Purple TV using the Cablenet TV GO service?
The Cablenet TV GO service is offered to TV Service Subscribers who have chosen the Purple TV package. In using the Cablenet TV GO service, there is a limit to the number of registered devices and simultaneous viewing points per account. The number of devices and simultaneous viewing points depends on the TV Service you have chosen. You can download the Cablenet TV GO app via Apple Store or Google Play, or connect via your browser. Once you have installed the Cablenet TV GO app, enter the username and password that Cablenet will send you (via text message to the registered mobile number) on the access page so that you can accept the Special Terms for TV services. You can register up to three (3) personal devices (smartphone/tablet/browser) however, for every additional viewing point (decoder) registered, the number of available personal devices that can be added will be reduced accordingly.
How can I get a new access code for the Cablenet TV GO service?
To change your Cablenet TV GO password, you can call 130 for immediate assistance, or you can submit your request electronically at https://tvgo-pass.cablenet.com.cy/forgot
How can I watch Cablenet TV GO from multiple devices at the same time?
Simultaneous viewing is permitted on 1 TV set and 1 phone. You are permitted an additional device if you are a STAR 1 or 2 subscriber.
How can I change the language of a TV show?
Press ![]() . The screen
. The screen  will appear, where you can select the language for audio and subtitles.
How can I watch a TV show I missed?
Arion
- Press the EPG button on the remote control.
- Select the show you wish to watch and press OK.
- Select Catch-up TV
- Press Back, Menu or EPG to return to normal programming.
- Press the Guide button on the remote control.
- Select the TV show you wish to watch and press OK.
- Select the ‘REPLAY’ icon.
- Press the back arrow on the remote control to display the horizontal menu where you can choose your desired option (such as TV, Guide etc.).
- Alternatively, press OK to display the playback overlay layer and select the
 icon to return to live TV programming.
- Go to TV Section and select TV.
- Select the channel you wish to watch.
- At the bottom of the screen, select the channel flow.
- Select the day and the episode/show.
- Select the name of the TV show and press ‘REPLAY’. Alternatively, select the three vertical dots and press
 ‘REPLAY’
How can I record a TV show to watch later?
If you’re a Purple TV subscriber, you have 5 hours’ availability. If you’re a Star 1 or Star 2 subscriber, you have 10 hours’ availability. AMINO
- Press the Guide button on the remote control.
- Select the TV show you wish to watch and press OK.
- Select the ‘Record TV’ icon.
- Press the back arrow on the remote control to display the horizontal menu where you can choose your desired option (such as TV, Guide etc.).
- Alternatively, press OK to display the playback overlay layer and select Record TV, or press the Record button on the remote control.
- Go to TV Section and select TV.
- Select the channel you wish to record.
- At the bottom of the screen, select the channel flow.
- Select the day and the episode/show.
How can I add an extra viewing point?
The Purple TV service includes one (1) viewing point. For additional viewing points, you may visit a Cablenet Store, contact us on 130, or make your request online by clicking here. The maximum number of additional viewing points is 2.
What sports events does NovaSports include?
The NovaSports channels include: Football
- Super League exclusive rights for home matches
- Bundesliga & Bundesliga 2
- Ligue 1
- Serie B
- French Super Cup
- German Super Cup
- EuroLeague
- EuroCup
- FIBA Men World Cup 2023
- FIBA Men and Women pre-Olympic Tournaments
- FIBA Mens Qualifies to EuroBasket 2025
- NCAA
- Davis Cup Finals 2023 - 2024
- WTA Tournaments (1000, 500, 250)
- ONE FC 2023
- Bare Knuckle Fight Championship
- National Fighting Championship
- Sail GP
- World Sailing Series
- Cycling Arctic Race of Norway
- Mobil 1 – The Grid
- Hankook 6 hour series
- World of Freesports
- Goodwood Race
- Titan Desert Mountain Bike
- Paris Marathon
- Barcelona Marathon
I want to cancel my subscription, and my contract hasn’t expired yet. What do I need to pay?
New subscribers: early termination fees for a 24month contract
|
Termination Month |
Administration Charge | Installation Charge | Services Used Charge |
TERMINATION FEE |
|
0 – Activation Month |
€25.00 | €60.00 | €0 | €85.00 |
|
1 |
€25.00 | €57.50 | €0 |
€82.50 |
| 2 | €25.00 | €55.00 | €0 |
€80.00 |
|
3 |
€25.00 | €52.50 | €0 | €77.50 |
|
4 |
€25.00 | €50.00 | €0 | €75.00 |
| 5 | €25.00 | €47.50 | €0 |
€72.50 |
| 6 | €25.00 | €45.00 | €0 |
€70.00 |
|
7 |
€25.00 | €42.50 | €0 | €67.50 |
|
8 |
€25.00 |
€40.00 | €0 |
€65.00 |
| 9 | €25.00 | €37.50 | €0 |
€62.50 |
|
10 |
€25.00 |
€35.00 | €0 | €60.00 |
|
11 |
€25.00 | €32.50 | €0 | €57.50 |
| 12 | €25.00 | €30.00 | €0 |
€ 55.00 |
| 13 | €25.00 | €27.50 | €0 |
€52.50 |
|
14 |
€25.00 |
€25.00 | €0 | €50.00 |
| 15 | €25.00 | €22.50 | €0 |
€47.50 |
|
16 |
€25.00 | €20.00 | €0 | €45.00 |
| 17 | €25.00 | €17.50 | €0 |
€42.50 |
|
18 |
€25.00 | €15.00 | €0 | €40.00 |
|
19 |
€25.00 | €12.50 | €0 |
€37.50 |
| 20 | €25.00 | €10.00 | €0 |
€35.00 |
|
21 |
€25.00 | €7.50 | €0 |
€32.50 |
|
22 |
€25.00 | €5.00 | €0 |
€30.00 |
| 23 | €25.00 | €2.50 | €0 |
€27.50 |
| 24 | €25.00 | €0 | €0 |
€25.00 |
| Termination Month | Administration Charge | Installation Charge | Services Used Charge |
TERMINATION FEE |
|
0 – Activation Month |
€25.00 | €0 | €0 |
€25.00 |
|
1 |
€25.00 | €0 | €0 |
€25.00 |
|
2 |
€25.00 | €0 | €0 |
€25.00 |
|
3 |
€25.00 |
€0 | €0 |
€25.00 |
|
4 |
€25.00 | €0 | €0 | €25.00 |
| 5 | €25.00 | €0 | €0 |
€25.00 |
|
6 |
€25.00 | €0 | €0 |
€25.00 |
|
7 |
€25.00 | €0 | €0 |
€25.00 |
|
8 |
€25.00 | €0 | €0 |
€25.00 |
|
9 |
€25.00 | €0 | €0 |
€25.00 |
|
10 |
€25.00 |
€0 | €0 |
€25.00 |
|
11 |
€25.00 | €0 | €0 |
€25.00 |
|
12 |
€25.00 | €0 | €0 |
€25.00 |
|
13 |
€25.00 | €0 | €0 |
€25.00 |
|
14 |
€25.00 | €0 | €0 |
€25.00 |
|
15 |
€25.00 | €0 | €0 |
€25.00 |
|
16 |
€25.00 |
€0 | €0 | €25.00 |
|
17 |
€25.00 | €0 | €0 | €25.00 |
|
18 |
€25.00 |
€0 | €0 | €25.00 |
|
19 |
€25.00 | €0 | €0 |
€25.00 |
| 20 | €25.00 | €0 | €0 |
€25.00 |
| 21 | €25.00 | €0 | €0 |
€25.00 |
| 22 | €25.00 | €0 | €0 |
€25.00 |
|
23 |
€25.00 | €0 | €0 | €25.00 |
| 24 | €25.00 | €0 | €0 |
€25.00 |
TV Features
What is the “Replay TV” function?
The “Replay TV” function is the ability to watch TV programs up to 7 days following their initial airing date, for as many times as you wish, without any limitations. This complementary function is available only for specific channels. A list of the channels that support this function can be found here.
What is the “Record TV” function?
The “Record TV” function is the ability to record TV programs up to 7 days ahead or prior to the current viewing time. This function is available only for specific channels. A list of the channels that support this function can be found here. This function supports up to 5 hours of recording content for Purple TV Subscribers and up to 10 hours for Star 1 or Star 2 add-ons subscribers. The content can be saved up to 30 days with no additional charges.
Is Video On Demand available via the Cablenet TV GO service?
Video on Demand services are currently unavailable on the Cablenet TV GO service.
Does Cablenet TV GO service provide Parental Control?
Yes, the Parental Control feature is directly associated and set within the user’s Profile settings. The Parental Control feature works in conjunction with the ability of the user to create different profiles for the younger members of the family. The parent that is the holder of the first profile (Admin) is advised to do two things:
- Protect their own profile with a PIN, through the “My PIN” sub-menu of the settings menu.
- Create additional profiles for the younger members of their family by pressing ‘+’ and follow the three step process and activate the parental control option.
How can I watch a TV show I missed?
Arion
- Press the EPG button on the remote control.
- Select the show you wish to watch and press OK.
- Select Catch-up TV
- Press Back, Menu or EPG to return to normal programming.
- Press the Guide button on the remote control.
- Select the TV show you wish to watch and press OK.
- Select the ‘REPLAY’ icon.
- Press the back arrow on the remote control to display the horizontal menu where you can choose your desired option (such as TV, Guide etc.).
- Alternatively, press OK to display the playback overlay layer and select the icon to return to live TV programming.
- Go to TV Section and select TV.
- Select the channel you wish to watch.
- At the bottom of the screen, select the channel flow.
- Select the day and the episode/show.
- Select the name of the TV show and press ‘REPLAY’. Alternatively, select the three vertical dots and press ‘REPLAY’
How can I record a TV show to watch later?
If you’re a Purple TV subscriber, you have 5 hours’ availability. If you’re a Star 1 or Star 2 subscriber, you have 10 hours’ availability. AMINO
- Press the Guide button on the remote control.
- Select the TV show you wish to watch and press OK.
- Select the ‘Record TV’ icon.
- Press the back arrow on the remote control to display the horizontal menu where you can choose your desired option (such as TV, Guide etc.).
- Alternatively, press OK to display the playback overlay layer and select Record TV, or press the Record button on the remote control.
- Go to TV Section and select TV.
- Select the channel you wish to record.
- At the bottom of the screen, select the channel flow.
- Select the day and the episode/show.
TV GO
What is the Cablenet TV GO service?
The Cablenet TV GO service allows the Subscribers to access live TV and other on demand content while on the go.
How can I access the Cablenet TV GO service?
You can download the Cablenet TV GO app by visiting the Apple Store or Google Play or via browser.
Who is eligible to use the Cablenet TV GO service?
The TV GO service is available to all Cablenet Subscribers who are subscribed to a commercially available package which includes the Purple TV service, and have at least one registered Cablenet Decoder.
Is the Cablenet TV GO service usage charged when on the go?
The user may be subject to mobile data usage charges when on the go that may apply from their mobile service operator and the specific mobile plan. The user can avoid such mobile data charges when using the Cablenet TV GO service via browser over free WiFi.
How can I set up and register the Cablenet TV GO app on my device?
The user must install the TV GO app and then use the username and password provided by Cablenet via SMS (to the registered mobile number) on the login page and accept the Special Terms for TV services.
How many devices can I register with the Cablenet TV GO service?
Subscribers can register up to three (3) of their own devices (smart phones/tablets/browser). However, every additional TV point (decoder) the Subscriber registers will respectively decrease the number of available personal devices the Subscriber can add.
What kind of devices can I register with the Cablenet TV GO service?
You can currently register smartphones and tablets (Android and iOS) with the Cablenet TV GO app. The use of PCs and Laptops is available through browser (Safari, Google, Firedox). The use of Smart TVs is currently unavailable.
How many users can watch content on the Cablenet TV GO service simultaneously?
Subscribers of Purple TV can watch content on one (1) smartphone, tablet or browser at the same time. Subscribers of Purple TV+ Star 1 and Purple TV+ Star 2 add-ons can watch content on two (2) smartphones, tablets or browsers simultaneously.
Do I need to sign-in every time I use the Cablenet TV GO service?
The user will only need to sign-in once, during the registration of the Cablenet TV GO service. After the first sign-in, the Subscriber will have access to the Cablenet TV GO service just by launching it on their device.
Which channels will be available on the Cablenet TV GO service?
The channels that are available on the Cablenet TV GO service can be found by clicking here. The number of channels available on the Cablenet TV GO service may change over time, due to Content Provider rights.
Can I watch the sports channels through the Cablenet TV GO service?
Yes, all channels included in the Purple Sports package are also available on the TV GO app, for customers who are also subscribed to one of the commercially available packages Variety TV, Variety Xtra TV or Complete TV.
Can I use the Cablenet TV GO service abroad?
The Cablenet TV GO service can also be used while in any EU country, however it is not accessible from any overseas location outside the EU. For more information about the roaming terms and conditions of the Cablenet TV GO app, please see the term 21, by clicking here (Special Terms for Services – TV Services).
Can I use the Cablenet TV GO service over another network?
The Cablenet TV GO service can also be used over any other network in Cyprus.
How can I watch Purple TV using the Cablenet TV GO service?
The Cablenet TV GO service is offered to TV Service Subscribers who have chosen the Purple TV package. In using the Cablenet TV GO service, there is a limit to the number of registered devices and simultaneous viewing points per account. The number of devices and simultaneous viewing points depends on the TV Service you have chosen. You can download the Cablenet TV GO app via Apple Store or Google Play, or connect via your browser. Once you have installed the Cablenet TV GO app, enter the username and password that Cablenet will send you (via text message to the registered mobile number) on the access page so that you can accept the Special Terms for TV services. You can register up to three (3) personal devices (smartphone/tablet/browser) however, for every additional viewing point (decoder) registered, the number of available personal devices that can be added will be reduced accordingly.
How can I get a new access code for the Cablenet TV GO service?
To change your Cablenet TV GO password, you can call 130 for immediate assistance, or you can submit your request electronically at https://tvgo-pass.cablenet.com.cy/forgot
How can I watch Cablenet TV GO from multiple devices at the same time?
Simultaneous viewing is permitted on 1 TV set and 1 phone. You are permitted an additional device if you are a STAR 1 or 2 subscriber.
How can I change the language of a TV show?
Press ![]() . The screen will appear, where you can select the language for audio and subtitles.
. The screen will appear, where you can select the language for audio and subtitles.
Which football competitions will be transmitted by Cablenet via the new joint platform?
All Cypriot Championship and Cup matches will be transmitted, as well as the most popular overseas competitions, such as UEFA Champions League, UEFA Europa League, UEFA Conference League, Premier League, Serie A (Italian Championship), Coppa Italia (Italian Cup), DFB German Cup, EFL (League) Cup, English FA CUP and Coupe de France.
Which channels are included in the new Purple Sports and European Sports bundles?
Purple Sports includes Cablenet Sports 1, Cablenet Sports 2, Cablenet Sports 3, Primetel 1HD, Cytavision Sports 1HD and Cytavision Sports 2HD. European Sports includes Cablenet Sports 2, Cablenet Sports 3, Cytavision Sports 3HD, Cytavision Sports 4HD, Cytavision Sports 5HD, Cytavision Sports 6HD and Cytavision Sports 7HD.
What sports content can I watch through Purple sports?
With the new Purple Sports package you can watch the sports content included in the Purple Sports TV 1: Purple Sports TV 1: Cyprus Football Championship & Cup A’ Division Men, Cyprus Football Championship & Cup B’ Division Men, Cyprus Football Championship & Cup A’ Division Women, Cablenet U19 Championship & Cup, EFL Championship, Belgian Championship & Cup (Jupiler Pro League & Croky Cup), Dutch Championship & Cup (Eredivisie Dutch League & KNVB Beker Cup), Argentine Championship (Argentine Primera Division & Copa De La Liga Profesional), Scottish Cup, Portuguese Cup (Taça de Portugal), Spanish Super Cup, Spanish Basketball – Liga Endesa & Copa Del Ray, Cyprus Volleyball Championship & Cup (Women & Men), Cyprus Handball Championship & Cup (Men), Futsal Men, Cyprus Athletics Championship, Cyprus Swimming Championship, Cyprus Gymnastics Championship, Cyprus Martial Arts Championships (Karate, Judo), Cyprus University Sports Championships
What sports content can I watch through the new European Sports bundle?
UEFA Champions League, UEFA Europa League, UEFA Conference League, Premier League, Serie A Championship, Coppa Italia, DFB German Cup, EFL Cup, FA Cup, Coupe de France, EFL Championship, Holland Championship – Eredivision, Belgium Championship Jupiler Pro League, Belgium Croky Cup, Portuguese Allianz Cup, Holland KVBN Cup, Scottish Cupς, Argentine Primera División, Cyprus Volleyball Championship & Cup (Women & Men), Cyprus Swimming Championship, Cyprus Gymnastics Championship and international gymnastics meetings, Cyprus Martial Arts Championships (Karate, Judo)
Can I combine Purple Sports with other TV services?
Yes. You have the following add-on options to choose from: Purple TV, FOX & FOXlife, Novacinema & Novasports and European sports.
Can I get the European Sports bundle without the Purple Sports package?
In order to get the European Sports bundle you must have an internet and the basic Purple TV services.
Can I get the Purple Sports package without the Internet service?
To get the Purple Sports package you must first subscribe to one of the available internet services.
Will Novasports channels be included in the new bundles?
Τα Novasports θα είναι διαθέσιμα μόνο για Συνδρομητές, νοουμένου ότι έχουν το επιπρόσθετο πακέτο Purple TV+ Star 2 (Novacinema & Novasports). Πλέον οι συνδρομητές μας μπορούν να το συνδυάσουν μαζί με το Purple Sports.
Will Cablenet Sports 3 be available to other providers?
Cablenet Sports 3 will be exclusively available to Cablenet Subscribers. The specific channel broadcasts games of various sports such as Cyprus Volleyball Championship & Cup, Cyprus Swimming Championship, Cyprus Gymnastics Championship and international meetings, and Cyprus Martial Arts Championships (Karate, Judo).
I am already a Cablenet Subscriber. How can I get the new Purple Sports package?
You can get them via one of the following ways:
- Via the Customer Call Center (130)
- Via the Cablenet Stores
- Via Apply Online
Will Cablenet transmit European qualifying stages and group stages when Cypriot teams are competing?
Cablenet will transmit all Cypriot teams’ European matches, including both qualifying and group stages. The matches of the Qualifying stages will be available only to those subscribers who have added the Purple Sports TV bundle. The matches of the Group stages will be available only to those subscribers who have added the European Sports TV bundle.
What happens when Cytavision broadcasts games that are not included in the new Cablenet sports package and add-on bundles?
In this case the streaming of the live broadcast for the specific games will be interrupted. A notice card will appear on the TV with relevant information.
How can I buy and watch a specific game?
With Cablenet's Live Streaming service, you can watch the matches of your favorite teams individually, specifically the games of APOEL, Anorthosis, Pafos FC, and Karmiotissa, in both the Championship and the Cup. Additionally, you can watch live matches of the Championship and Cup in the U19 category. You can also watch live matches of all sports broadcasted on Cablenet Sports channels such as Volleyball Championship and Cup, Handball matches, Athletics, Swimming / Water Polo, Rhythmic and Artistic gymnastics, Judo, Karate, as well as Motorsports. All you need to do is sign up for the Live Streaming service through the website, select the match you wish to watch, and proceed with the purchase. Additionally, special monthly packages are available, depending on the category and content you want to access. For further assistance, you can contact the Cablenet Call Centre on 130.
I want to cancel my subscription, and my contract hasn’t expired yet. What do I need to pay?
New subscribers: early termination fees for a 24month contract
|
Termination Month |
Administration Charge | Installation Charge | Services Used Charge |
TERMINATION FEE |
|
0 – Activation Month |
€25.00 | €60.00 | €0 | €85.00 |
|
1 |
€25.00 | €57.50 | €0 |
€82.50 |
| 2 | €25.00 | €55.00 | €0 |
€80.00 |
|
3 |
€25.00 | €52.50 | €0 | €77.50 |
|
4 |
€25.00 | €50.00 | €0 | €75.00 |
| 5 | €25.00 | €47.50 | €0 |
€72.50 |
| 6 | €25.00 | €45.00 | €0 |
€70.00 |
|
7 |
€25.00 | €42.50 | €0 | €67.50 |
|
8 |
€25.00 |
€40.00 | €0 |
€65.00 |
| 9 | €25.00 | €37.50 | €0 |
€62.50 |
|
10 |
€25.00 |
€35.00 | €0 | €60.00 |
|
11 |
€25.00 | €32.50 | €0 | €57.50 |
| 12 | €25.00 | €30.00 | €0 |
€ 55.00 |
| 13 | €25.00 | €27.50 | €0 |
€52.50 |
|
14 |
€25.00 |
€25.00 | €0 | €50.00 |
| 15 | €25.00 | €22.50 | €0 |
€47.50 |
|
16 |
€25.00 | €20.00 | €0 | €45.00 |
| 17 | €25.00 | €17.50 | €0 |
€42.50 |
|
18 |
€25.00 | €15.00 | €0 | €40.00 |
|
19 |
€25.00 | €12.50 | €0 |
€37.50 |
| 20 | €25.00 | €10.00 | €0 |
€35.00 |
|
21 |
€25.00 | €7.50 | €0 |
€32.50 |
|
22 |
€25.00 | €5.00 | €0 |
€30.00 |
| 23 | €25.00 | €2.50 | €0 |
€27.50 |
| 24 | €25.00 | €0 | €0 |
€25.00 |
| Termination Month | Administration Charge | Installation Charge | Services Used Charge |
TERMINATION FEE |
|
0 – Activation Month |
€25.00 | €0 | €0 |
€25.00 |
|
1 |
€25.00 | €0 | €0 |
€25.00 |
|
2 |
€25.00 | €0 | €0 |
€25.00 |
|
3 |
€25.00 |
€0 | €0 |
€25.00 |
|
4 |
€25.00 | €0 | €0 | €25.00 |
| 5 | €25.00 | €0 | €0 |
€25.00 |
|
6 |
€25.00 | €0 | €0 |
€25.00 |
|
7 |
€25.00 | €0 | €0 |
€25.00 |
|
8 |
€25.00 | €0 | €0 |
€25.00 |
|
9 |
€25.00 | €0 | €0 |
€25.00 |
|
10 |
€25.00 |
€0 | €0 |
€25.00 |
|
11 |
€25.00 | €0 | €0 |
€25.00 |
|
12 |
€25.00 | €0 | €0 |
€25.00 |
|
13 |
€25.00 | €0 | €0 |
€25.00 |
|
14 |
€25.00 | €0 | €0 |
€25.00 |
|
15 |
€25.00 | €0 | €0 |
€25.00 |
|
16 |
€25.00 |
€0 | €0 | €25.00 |
|
17 |
€25.00 | €0 | €0 | €25.00 |
|
18 |
€25.00 |
€0 | €0 | €25.00 |
|
19 |
€25.00 | €0 | €0 |
€25.00 |
| 20 | €25.00 | €0 | €0 |
€25.00 |
| 21 | €25.00 | €0 | €0 |
€25.00 |
| 22 | €25.00 | €0 | €0 |
€25.00 |
|
23 |
€25.00 | €0 | €0 | €25.00 |
| 24 | €25.00 | €0 | €0 |
€25.00 |
Maxify
What is the Maxify program?
Maxify is a program through which Cablenet subscribers will be able to accumulate and redeem points in exchange for services, electronic devices, and any other benefits available through the program.
Who is eligible to participate in the Maxify program?
To participate in the Maxify program you must have at least one active subscription with Cablenet, download and register in the Maxify App. Cablenet Prepaid subscribers are excluded.
How can I access the Maxify App?
The app can be downloaded via Google Play or App Store, depending on your device. During the registration process, you will be asked to provide the mobile number which is registered as your contact number with Cablenet. For assistance during the registration process, call us on 130.
How do I collect points?
Points will be calculated monthly and collected automatically, according to the services you own with Cablenet. Additionally, points can be accumulated through new service additions, upgrades to services and though promotional activities that Cablenet will host from time to time.
How do I redeem points?
Points can be redeemed through the Maxify App.
When do points expire?
Points do not have an expiry date.
Will I be able to transfer my points to another active member of the program?
You may transfer your points to any active member of the program at any given time
What happens to my points in case that I terminate all my services with Cablenet?
In case of terminating all of your services, all of your accumulated points will be lost. However, you have the option to transfer your points to another active member of the program prior to termination.
How can I delete my MAXify account?
To request the deletion of your account, send an email to maxify@cablenetcy.net with your mobile number as the subject.